Theoretical Paper
- Computer Organization
- Data Structure
- Digital Electronics
- Object Oriented Programming
- Discrete Mathematics
- Graph Theory
- Operating Systems
- Software Engineering
- Computer Graphics
- Database Management System
- Operation Research
- Computer Networking
- Image Processing
- Internet Technologies
- Micro Processor
- E-Commerce & ERP
- Dart Programming
- Flutter Tutorial
- Numerical Methods Tutorials
- Flutter Tutorials
- Kotlin Tutorial
Practical Paper
Industrial Training

Kotlin Android Custom ListView
In the previous tutorial Kotlin Android ListView, we have created an example of default ListView. Android provides a facility to customize the ListView. In this tutorial, we will customize our ListView.
An Adapter class is used to add the list items in the list. It bridges the list of data between an AdapterView with other Views components (ListView, ScrollView, etc.).
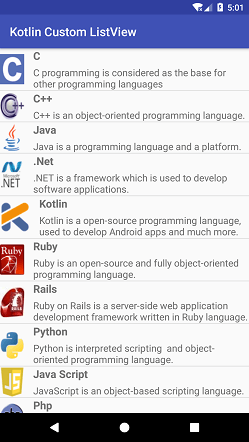
Kotlin Android Custom ListView Example
In this example, we will create a custom ListView and perform click action on list items. In this custom ListView, we add one image and two different text descriptions for each row of ListView.
activity_main.xml
In the activity_main.xml file add a ListView component to display the list of items.
< ?xml version="1.0" encoding="utf-8"?>
< android.support.constraint.ConstraintLayout xmlns:android="http://schemas.android.com/apk/res/android"
    xmlns:app="http://schemas.android.com/apk/res-auto"
    xmlns:tools="http://schemas.android.com/tools"
    android:layout_width="match_parent"
    android:layout_height="match_parent"
    tools:context="example.javatpoint.com.kotlincustomlistview.MainActivity">

    < ListView
        android:id="@+id/listView"
        android:layout_width="match_parent"
        android:layout_height="match_parent"/>
< /android.support.constraint.ConstraintLayout>
custom_list.xml
Create a layout file named as custom_list.xml in the layout directory and add one ImageView and two TextView. The ImageView is used to display image, one TextView to display the title and another TextView to display text description.
< ?xml version="1.0" encoding="utf-8"?>
< LinearLayout xmlns:android="http://schemas.android.com/apk/res/android"
    xmlns:app="http://schemas.android.com/apk/res-auto"
    android:layout_width="match_parent"
    android:layout_height="match_parent"
    android:orientation="horizontal">
    < LinearLayout
        android:orientation="horizontal"
        android:layout_width="wrap_content"
        android:layout_height="wrap_content"
        android:gravity="center" >
    < ImageView
        android:id="@+id/icon"
        android:layout_width="wrap_content"
        android:layout_height="wrap_content"
        app:srcCompat="@mipmap/ic_launcher" />

    < LinearLayout
        android:layout_width="match_parent"
        android:layout_height="wrap_content"
        android:layout_weight="1"
        android:orientation="vertical">

        < TextView
            android:id="@+id/title"
            android:layout_width="match_parent"
            android:layout_height="wrap_content"
            android:text="title"
            android:textStyle="bold"
            android:layout_marginLeft="15dp"
            android:layout_marginStart="15dp"
            android:textAppearance="@style/Base.TextAppearance.AppCompat.Medium" />

        < TextView
            android:id="@+id/description"
            android:layout_width="match_parent"
            android:layout_height="wrap_content"
            android:text="description"
            android:layout_marginLeft="15dp"
            android:layout_marginStart="15dp"
            android:layout_marginTop="5dp"
            android:textSize="16sp"/>
    < /LinearLayout>
    < /LinearLayout>
< /LinearLayout>
MainActivity.kt
Add the following code in the MainActivity.kt class. In this class, we are creating two String array and one Int array to store string text and image id respectively.
From this class, we are calling a custom adapter class named as MyListAdapter by passing the context and data as the parameters. The listView.adapter = myListAdapter set the return adapter to the ListView.
package example.javatpoint.com.kotlincustomlistview
import android.support.v7.app.AppCompatActivity
import android.os.Bundle
import android.widget.Toast
import kotlinx.android.synthetic.main.activity_main.*
class MainActivity : AppCompatActivity() {
val language = arrayOf< String>("C","C++","Java",".Net","Kotlin","Ruby","Rails","Python","Java Script","Php","Ajax","Perl","Hadoop")
val description = arrayOf< String>(
"C programming is considered as the base for other programming languages",
"C++ is an object-oriented programming language.",
"Java is a programming language and a platform.",
".NET is a framework which is used to develop software applications.",
"Kotlin is a open-source programming language, used to develop Android apps and much more.",
"Ruby is an open-source and fully object-oriented programming language.",
"Ruby on Rails is a server-side web application development framework written in Ruby language.",
"Python is interpreted scripting and object-oriented programming language.",
"JavaScript is an object-based scripting language.",
"PHP is an interpreted language, i.e., there is no need for compilation.",
"AJAX allows you to send and receive data asynchronously without reloading the web page.",
"Perl is a cross-platform environment used to create network and server-side applications.",
"Hadoop is an open source framework from Apache written in Java."
)
val imageId = arrayOf< Int>(
R.drawable.c_image,R.drawable.cpp_image,R.drawable.java_image,
R.drawable.net_image,R.drawable.kotlin_image,R.drawable.ruby_image,
R.drawable.rails_image,R.drawable.python_image,R.drawable.js_image,
R.drawable.php_image,R.drawable.ajax_image,R.drawable.python_image,
R.drawable.hadoop_image
)
override fun onCreate(savedInstanceState: Bundle?) {
super.onCreate(savedInstanceState)
setContentView(R.layout.activity_main)
val myListAdapter = MyListAdapter(this,language,description,imageId)
listView.adapter = myListAdapter
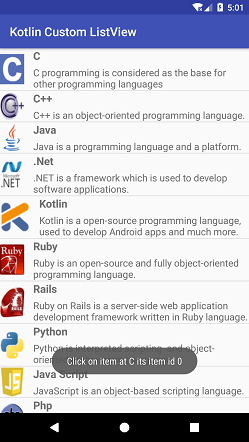
listView.setOnItemClickListener(){adapterView, view, position, id ->
val itemAtPos = adapterView.getItemAtPosition(position)
val itemIdAtPos = adapterView.getItemIdAtPosition(position)
Toast.makeText(this, "Click on item at $itemAtPos its item id $itemIdAtPos", Toast.LENGTH_LONG).show()
}
}
}
MyListAdapter.kt
Now, create a custom adapter class named as MyListAdapter.kt which populates the data model into the ListView.
package example.javatpoint.com.kotlincustomlistview

import android.app.Activity
import android.view.View
import android.view.ViewGroup
import android.widget.*
class MyListAdapter(private val context: Activity, private val title: Array< String>, private val description: Array< String>, private val imgid: Array< Int>)
    : ArrayAdapter< String>(context, R.layout.custom_list, title) {

    override fun getView(position: Int, view: View?, parent: ViewGroup): View {
        val inflater = context.layoutInflater
        val rowView = inflater.inflate(R.layout.custom_list, null, true)

        val titleText = rowView.findViewById(R.id.title) as TextView
        val imageView = rowView.findViewById(R.id.icon) as ImageView
        val subtitleText = rowView.findViewById(R.id.description) as TextView

        titleText.text = title[position]
        imageView.setImageResource(imgid[position])
        subtitleText.text = description[position]

        return rowView
    }
}
Output: