Theoretical Paper
- Computer Organization
- Data Structure
- Digital Electronics
- Object Oriented Programming
- Discrete Mathematics
- Graph Theory
- Operating Systems
- Software Engineering
- Computer Graphics
- Database Management System
- Operation Research
- Computer Networking
- Image Processing
- Internet Technologies
- Micro Processor
- E-Commerce & ERP
Practical Paper
Industrial Training
Android - Network Connection
Android lets your application connect to the internet or any other local network and allows you to perform network operations.
A device can have various types of network connections. This chapter focuses on using either a Wi-Fi or a mobile network connection.
Checking Network Connection
Before you perform any network operations, you must first check that are you connected to that network or internet e.t.c. For this android provides ConnectivityManager class. You need to instantiate an object of this class by calling getSystemService() method. Its syntax is given below −
ConnectivityManager check = (ConnectivityManager)
this.context.getSystemService(Context.CONNECTIVITY_SERVICE);
Once you instantiate the object of ConnectivityManager class, you can use getAllNetworkInfo method to get the information of all the networks. This method returns an array of NetworkInfo. So you have to receive it like this.
NetworkInfo[] info = check.getAllNetworkInfo();
The last thing you need to do is to check Connected State of the network. Its syntax is given below −
for (int i = 0; i< info.length; i++){
   if (info[i].getState() == NetworkInfo.State.CONNECTED){
      Toast.makeText(context, "Internet is connected
      Toast.LENGTH_SHORT).show();
   }
}
Apart from this connected states, there are other states a network can achieve. They are listed below −
| Sr.No | State |
| 1 | Connecting. |
| 2 | Disconnected |
| 3 | Disconnecting |
| 4 | Suspended |
| 5 | Unknown |
Performing Network Operations
After checking that you are connected to the internet, you can perform any network operation. Here we are fetching the html of a website from a url.
Android provides HttpURLConnection and URL class to handle these operations. You need to instantiate an object of URL class by providing the link of website. Its syntax is as follows −
String link = "http://www.google.com";
URL url = new URL(link);
After that you need to call openConnection method of url class and receive it in a HttpURLConnection object. After that you need to call the connect method of HttpURLConnection class.
HttpURLConnection conn = (HttpURLConnection) url.openConnection();
conn.connect();
And the last thing you need to do is to fetch the HTML from the website. For this you will use InputStream and BufferedReader class. Its syntax is given below −
InputStream is = conn.getInputStream();
BufferedReader reader = new BufferedReader(new InputStreamReader(is, "UTF-8"));
String webPage = "",data="";

while ((data = reader.readLine()) != null){
   webPage += data + "\n";
}
Apart from this connect method, there are other methods available in HttpURLConnection class. They are listed below −
| Sr.No | Method & description |
| 1 | disconnect() |
| 2 | getRequestMethod() |
| 3 | getResponseCode() |
| 4 | setRequestMethod(String method) |
| 5 | usingProxy() |
Example
The below example demonstrates the use of HttpURLConnection class. It creates a basic application that allows you to download HTML from a given web page.
To experiment with this example, you need to run this on an actual device on which wifi internet is connected .
| Steps | Description |
| 1 | You will use Android studio IDE to create an Android application under a package com.tutorialspoint.myapplication. |
| 2 | Modify src/MainActivity.java file to add Activity code |
| 3 | Modify layout XML file res/layout/activity_main.xml add any GUI component if required. |
| 4 | Modify AndroidManifest.xml to add necessary permissions. |
| 5 | Run the application and choose a running android device and install the application on it and verify the results. |
Here is the content of src/MainActivity.java.
package com.tutorialspoint.myapplication;

import android.app.ProgressDialog;
import android.graphics.Bitmap;
import android.graphics.BitmapFactory;

import android.net.ConnectivityManager;
import android.os.Bundle;
import android.os.Handler;
import android.os.Message;
import android.support.v7.app.ActionBarActivity;
import android.view.View;

import android.widget.Button;
import android.widget.ImageView;
import android.widget.Toast;

import java.io.IOException;
import java.io.InputStream;

import java.net.HttpURLConnection;
import java.net.MalformedURLException;
import java.net.URL;
import java.net.URLConnection;

public class MainActivity extends ActionBarActivity {
   private ProgressDialog progressDialog;
   private Bitmap bitmap = null;
   Button b1;

   @Override
   protected void onCreate(Bundle savedInstanceState) {
      super.onCreate(savedInstanceState);
      setContentView(R.layout.activity_main);
      b1 = (Button) findViewById(R.id.button);

      b1.setOnClickListener(new View.OnClickListener() {
         @Override
         public void onClick(View v) {
            checkInternetConenction();
            downloadImage("http://www.tutorialspoint.com/green/images/logo.png");
         }
      });
   }

   private void downloadImage(String urlStr) {
      progressDialog = ProgressDialog.show(this, "", "Downloading Image from " + urlStr);
      final String url = urlStr;

      new Thread() {
         public void run() {
            InputStream in = null;

            Message msg = Message.obtain();
            msg.what = 1;

            try {
               in = openHttpConnection(url);
               bitmap = BitmapFactory.decodeStream(in);
               Bundle b = new Bundle();
               b.putParcelable("bitmap", bitmap);
               msg.setData(b);
               in.close();
            }catch (IOException e1) {
               e1.printStackTrace();
            }
            messageHandler.sendMessage(msg);
         }
      }.start();
   }

   private InputStream openHttpConnection(String urlStr) {
      InputStream in = null;
      int resCode = -1;

      try {
         URL url = new URL(urlStr);
         URLConnection urlConn = url.openConnection();

         if (!(urlConn instanceof HttpURLConnection)) {
            throw new IOException("URL is not an Http URL");
         }

         HttpURLConnection httpConn = (HttpURLConnection) urlConn;
         httpConn.setAllowUserInteraction(false);
         httpConn.setInstanceFollowRedirects(true);
         httpConn.setRequestMethod("GET");
         httpConn.connect();
         resCode = httpConn.getResponseCode();

         if (resCode == HttpURLConnection.HTTP_OK) {
            in = httpConn.getInputStream();
         }
      }catch (MalformedURLException e) {
         e.printStackTrace();
      }catch (IOException e) {
         e.printStackTrace();
      }
      return in;
   }

   private Handler messageHandler = new Handler() {
      public void handleMessage(Message msg) {
         super.handleMessage(msg);
         ImageView img = (ImageView) findViewById(R.id.imageView);
         img.setImageBitmap((Bitmap) (msg.getData().getParcelable("bitmap")));
         progressDialog.dismiss();
      }
   };

   private boolean checkInternetConenction() {
      // get Connectivity Manager object to check connection
      ConnectivityManager connec
         =(ConnectivityManager)getSystemService(getBaseContext().CONNECTIVITY_SERVICE);

      // Check for network connections
      if ( connec.getNetworkInfo(0).getState() ==
         android.net.NetworkInfo.State.CONNECTED ||
         connec.getNetworkInfo(0).getState() ==
         android.net.NetworkInfo.State.CONNECTING ||
         connec.getNetworkInfo(1).getState() ==
         android.net.NetworkInfo.State.CONNECTING ||
         connec.getNetworkInfo(1).getState() == android.net.NetworkInfo.State.CONNECTED ) {
            Toast.makeText(this, " Connected ", Toast.LENGTH_LONG).show();
            return true;
         }else if (
            connec.getNetworkInfo(0).getState() ==
            android.net.NetworkInfo.State.DISCONNECTED ||
            connec.getNetworkInfo(1).getState() ==
            android.net.NetworkInfo.State.DISCONNECTED  ) {
               Toast.makeText(this, " Not Connected ", Toast.LENGTH_LONG).show();
               return false;
            }
         return false;
   }

}
Here is the content of activity_main.xml.
< ?xml version="1.0" encoding="utf-8"?>
< RelativeLayout xmlns:android="http://schemas.android.com/apk/res/android"
   xmlns:tools="http://schemas.android.com/tools" android:layout_width="match_parent"
   android:layout_height="match_parent" android:paddingLeft="@dimen/activity_horizontal_margin"
   android:paddingRight="@dimen/activity_horizontal_margin"
   android:paddingTop="@dimen/activity_vertical_margin"
   android:paddingBottom="@dimen/activity_vertical_margin" tools:context=".MainActivity">

   < TextView
      android:layout_width="wrap_content"
      android:layout_height="wrap_content"
      android:text="UI Animator Viewer"
      android:id="@+id/textView"
      android:textSize="25sp"
      android:layout_centerHorizontal="true" />

   < TextView
      android:layout_width="wrap_content"
      android:layout_height="wrap_content"
      android:text="Mca tutorials"
      android:id="@+id/textView2"
      android:layout_below="@+id/textView"
      android:layout_alignRight="@+id/textView"
      android:layout_alignEnd="@+id/textView"
      android:textColor="#ff36ff15"
      android:textIsSelectable="false"
      android:textSize="35dp" />

   < ImageView
      android:layout_width="wrap_content"
      android:layout_height="wrap_content"
      android:id="@+id/imageView"
      android:layout_below="@+id/textView2"
      android:layout_centerHorizontal="true" />

   < Button
      android:layout_width="wrap_content"
      android:layout_height="wrap_content"
      android:text="Button"
      android:id="@+id/button"
      android:layout_below="@+id/imageView"
      android:layout_centerHorizontal="true"
      android:layout_marginTop="76dp" />

< /RelativeLayout>
Here is the content of Strings.xml.
< resources>
   < string name="app_name">My Application< /string>
< /resources>
Here is the content of AndroidManifest.xml.
< ?xml version="1.0" encoding="utf-8"?>
< manifest xmlns:android="http://schemas.android.com/apk/res/android"
   package="com.tutorialspoint.myapplication" >
   < uses-permission android:name="android.permission.INTERNET">< /uses-permission>
   < uses-permission android:name="android.permission.ACCESS_NETWORK_STATE">

   < application
      android:allowBackup="true"
      android:icon="@mipmap/ic_launcher"
      android:label="@string/app_name"
      android:theme="@style/AppTheme" >

      < activity
         android:name=".MainActivity"
         android:label="@string/app_name" >

         < intent-filter>
            < action android:name="android.intent.action.MAIN" />
            < category android:name="android.intent.category.LAUNCHER" />
         < /intent-filter>

      < /activity>

   < /application>
< /manifest>
Let's try to run your application. I assume you have connected your actual Android Mobile device with your computer. To run the app from android studio, open one of your project's activity files and click Run  icon from the tool bar. Before starting your application, Android studio will display following window to select an option where you want to run your Android application.

Select your mobile device as an option and then check your mobile device which will display following screen −

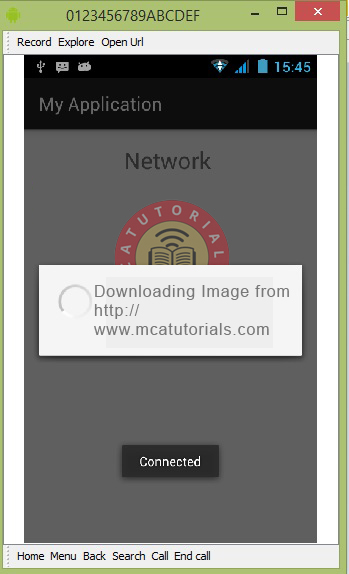
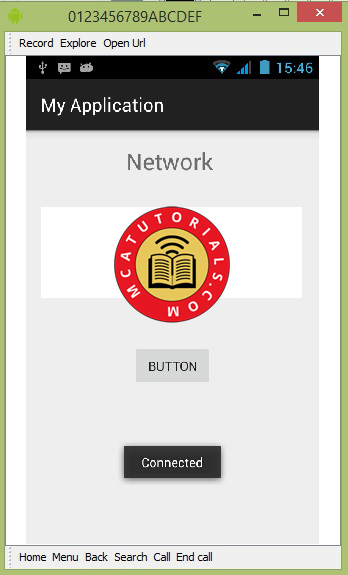
Now just click on button, It will check internet connection as well as it will download image.

Out would be as follows and it has fetch the logo from internet.


