Theoretical Paper
- Computer Organization
- Data Structure
- Digital Electronics
- Object Oriented Programming
- Discrete Mathematics
- Graph Theory
- Operating Systems
- Software Engineering
- Computer Graphics
- Database Management System
- Operation Research
- Computer Networking
- Image Processing
- Internet Technologies
- Micro Processor
- E-Commerce & ERP
Practical Paper
Industrial Training
Android - Best Practices
There are some practices that you can follow while developing android application. These are suggested by the android itself and they keep on improving with respect to time.
These best practices include interaction design features, performance, security and privacy, compatibility, testing, distributing and monetizing tips. They are narrowed down and are listed as below.
Best Practices - User input
Every text field is intended for a different job. For example, some text fields are for text and some are for numbers. If it is for numbers then it is better to display the numeric keypad when that textfield is focused. Its syntax is.
< EditText
   android:layout_width="wrap_content"
   android:layout_height="wrap_content"
   android:id="@+id/editText"
   android:layout_alignParentRight="true"
   android:layout_alignParentEnd="true"
   android:hint="User Name"
   android:layout_below="@+id/imageView"
   android:layout_alignLeft="@+id/imageView"
   android:layout_alignStart="@+id/imageView"
   android:numeric="integer" />
Other then that if your field is for password, then it must show a password hint, so that the user can easily remember the password. It can be achieved as.
< EditText
   android:layout_width="wrap_content"
   android:layout_height="wrap_content"
   android:id="@+id/editText2"
   android:layout_alignLeft="@+id/editText"
   android:layout_alignStart="@+id/editText"
   android:hint="Pass Word"
   android:layout_below="@+id/editText"
   android:layout_alignRight="@+id/editText"
   android:layout_alignEnd="@+id/editText"
   android:password="true" />
Best Practices - Background jobs
There are certain jobs in an application that are running in an application background. Their job might be to fetch some thing from the internet , playing music e.t.c. It is recommended that the long awaiting tasks should not be done in the UI thread and rather in the background by services or AsyncTask.
AsyncTask Vs Services.
Both are used for doing background tasks , but the service is not affected by most user interface life cycle events, so it continues to run in circumstances that would shut down an AsyncTask.
Best Practices - Performance
Your application performance should be up-to the mark. But it should perform differently not on the front end , but on the back end when it the device is connected to a power source or charging. Charging could be of from USB and from wire cable.
When your device is charging itself , it is recommended to update your application settings if any, such as maximizing your refresh rate whenever the device is connected. It can be done as this.
IntentFilter ifilter = new IntentFilter(Intent.ACTION_BATTERY_CHANGED);
Intent batteryStatus = context.registerReceiver(null, ifilter);

// Are we charging / charged? Full or charging.
int status = batteryStatus.getIntExtra(BatteryManager.EXTRA_STATUS, -1);

// How are we charging? From AC or USB.
int chargePlug = batteryStatus.getIntExtra(BatteryManager.EXTRA_PLUGGED, -1);
Best Practices - Security and privacy
It is very important that your application should be secure and not only the application , but the user data and the application data should also be secured. The security can be increased by the following factors.
- Use internal storage rather then external for storing applications files
- Use content providers wherever possible
- Use SSl when connecting to the web
- Use appropriate permissions for accessing different functionalities of device
Example
The below example demonstrates some of the best practices you should follow when developing android application. It crates a basic application that allows you to specify how to use text fields and how to increase performance by checking the charging status of the phone.
To experiment with this example , you need to run this on an actual device.
| Steps | Description |
| 1 | You will use Android studio IDE to create an Android application under a package com.example.sairamkrishna.myapplication. |
| 2 | Modify src/MainActivity.java file to add the code |
| 3 | Modify layout XML file res/layout/activity_main.xml add any GUI component if required. |
| 4 | Run the application and choose a running android device and install the application on it and verify the results. |
Here is the content of src/MainActivity.java
package com.example.sairamkrishna.myapplication;

import android.content.Intent;
import android.content.IntentFilter;
import android.os.BatteryManager;
import android.support.v7.app.ActionBarActivity;
import android.os.Bundle;
import android.view.View;
import android.widget.Button;
import android.widget.EditText;
import android.widget.Toast;

public class MainActivity extends ActionBarActivity {
   EditText ed1,ed2;
   Button b1;

   @Override
   protected void onCreate(Bundle savedInstanceState) {
      super.onCreate(savedInstanceState);
      setContentView(R.layout.activity_main);

      ed1=(EditText)findViewById(R.id.editText);
      ed2=(EditText)findViewById(R.id.editText2);
      b1=(Button)findViewById(R.id.button);

      b1.setOnClickListener(new View.OnClickListener() {
         @Override

         public void onClick(View v) {
            IntentFilter ifilter = new IntentFilter(Intent.ACTION_BATTERY_CHANGED);
            Intent batteryStatus = registerReceiver(null, ifilter);

            int status = batteryStatus.getIntExtra(BatteryManager.EXTRA_STATUS, -1);
            boolean isCharging = status == BatteryManager.BATTERY_STATUS_CHARGING ||
            status == BatteryManager.BATTERY_STATUS_FULL;

            int chargePlug = batteryStatus.getIntExtra(BatteryManager.EXTRA_PLUGGED,-1);
            boolean usbCharge = chargePlug == BatteryManager.BATTERY_PLUGGED_USB;
            boolean acCharge = chargePlug == BatteryManager.BATTERY_PLUGGED_AC;

            if(usbCharge){
               Toast.makeText(getApplicationContext(),"Mobile is charging on USB",
                  Toast.LENGTH_LONG).show();
            } else {
               Toast.makeText(getApplicationContext(),"Mobile is charging on AC",
                  Toast.LENGTH_LONG).show();
            }
         }
      });
   }

   @Override
   protected void onDestroy() {
      super.onDestroy();
   }
}
Here is the content of activity_main.xml
< ?xml version="1.0" encoding="utf-8"?>
   < RelativeLayout
   xmlns:android="http://schemas.android.com/apk/res/android"
   xmlns:tools="http://schemas.android.com/tools"
   android:layout_width="match_parent"
   android:layout_height="match_parent"
   android:paddingLeft="@dimen/activity_horizontal_margin"
   android:paddingRight="@dimen/activity_horizontal_margin"
   android:paddingTop="@dimen/activity_vertical_margin"
   android:paddingBottom="@dimen/activity_vertical_margin"
   tools:context=".MainActivity">

   < TextView android:text="Bluetooth Example"
      android:layout_width="wrap_content"
      android:layout_height="wrap_content"
      android:id="@+id/textview"
      android:textSize="35dp"
      android:layout_alignParentTop="true"
      android:layout_centerHorizontal="true" />

   < TextView
      android:layout_width="wrap_content"
      android:layout_height="wrap_content"
      android:text="Mca tutorials"
      android:id="@+id/textView"
      android:layout_below="@+id/textview"
      android:layout_centerHorizontal="true"
      android:textColor="#ff7aff24"
      android:textSize="35dp" />

   < ImageView
      android:layout_width="wrap_content"
      android:layout_height="wrap_content"
      android:id="@+id/imageView"
      android:src="@drawable/abc"
      android:layout_below="@+id/textView"
      android:layout_centerHorizontal="true" />

   < EditText
      android:layout_width="wrap_content"
      android:layout_height="wrap_content"
      android:id="@+id/editText"
      android:layout_alignParentRight="true"
      android:layout_alignParentEnd="true"
      android:hint="User Name"
      android:layout_below="@+id/imageView"
      android:layout_alignLeft="@+id/imageView"
      android:layout_alignStart="@+id/imageView"
      android:numeric="integer" />

   < EditText
      android:layout_width="wrap_content"
      android:layout_height="wrap_content"
      android:id="@+id/editText2"
      android:layout_alignLeft="@+id/editText"
      android:layout_alignStart="@+id/editText"
      android:hint="Pass Word"
      android:layout_below="@+id/editText"
      android:layout_alignRight="@+id/editText"
      android:layout_alignEnd="@+id/editText"
      android:password="true" />

   < Button
      android:layout_width="wrap_content"
      android:layout_height="wrap_content"
      android:text="Check"
      android:id="@+id/button"
      android:layout_below="@+id/editText2"
      android:layout_centerHorizontal="true" />

< /RelativeLayout>
Here is the content of Strings.xml
< resources>
    < string name="app_name">My Application< /string>
< /resources>
Here is the content of AndroidManifest.xml.
< ?xml version="1.0" encoding="utf-8"?>
< manifest xmlns:android="http://schemas.android.com/apk/res/android"
   package="com.example.sairamkrishna.myapplication" >

   < application
      android:allowBackup="true"
      android:icon="@drawable/ic_launcher"
      android:label="@string/app_name"
      android:theme="@style/AppTheme" >

      < activity
         android:name="com.example.sairamkrishna.myapplication.MainActivity"
         android:label="@string/app_name" >

         < intent-filter>
            < action android:name="android.intent.action.MAIN" />
            < category android:name="android.intent.category.LAUNCHER" />
         < /intent-filter>

      < /activity>

   < /application>
< /manifest>
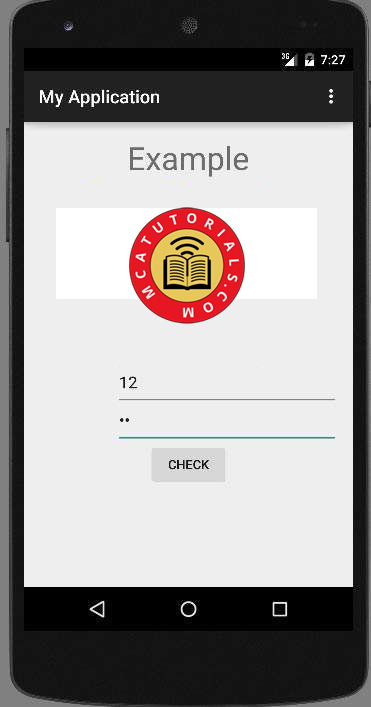
Let's try to run your application. I assume you have connected your actual Android Mobile device with your computer. To run the app from Android studio, open one of your project's activity files and click Run icon from the tool bar. Android Studio will display following Images.

Above image shows an output of application

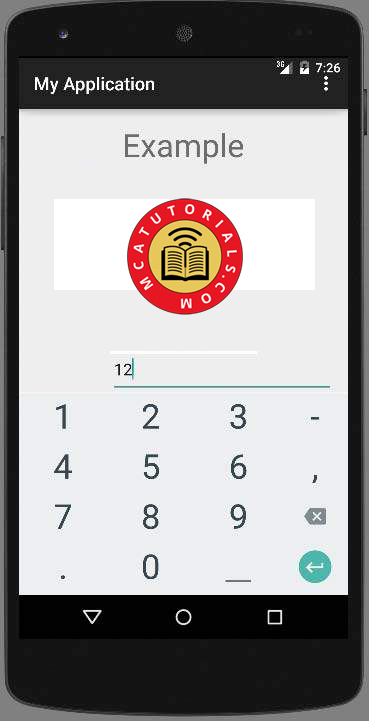
Now just type on the username field and you will see the built in android suggestions from the dictionary will start coming up. This is shown Above.

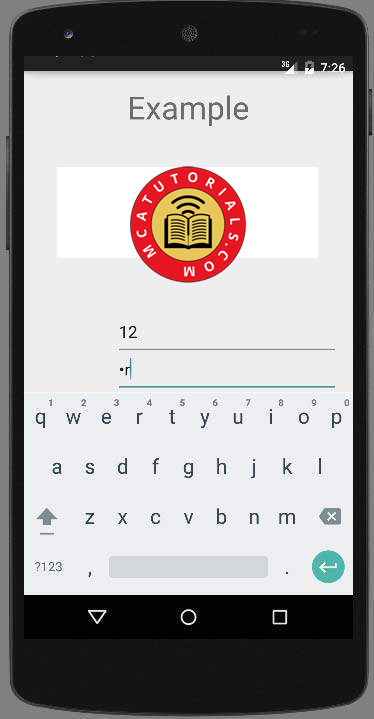
Now you will see the password field. It would disappear as soon as you start writing in the field. It is shown above.
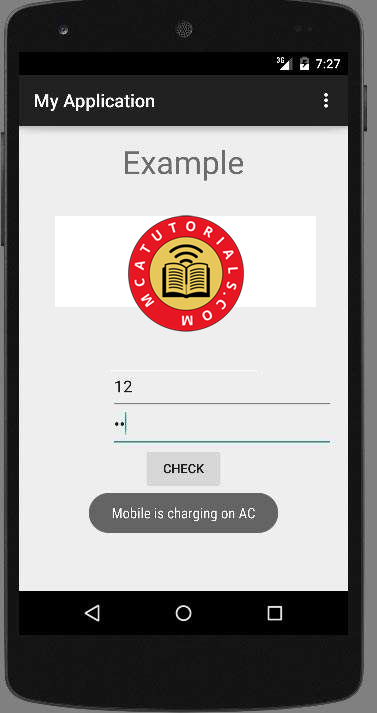
In the end , just connect your device to AC cable or USB cable and press on charging check button. In my case , i connect AC power,it shows the following message.


