Theoretical Paper
- Computer Organization
- Data Structure
- Digital Electronics
- Object Oriented Programming
- Discrete Mathematics
- Graph Theory
- Operating Systems
- Software Engineering
- Computer Graphics
- Database Management System
- Operation Research
- Computer Networking
- Image Processing
- Internet Technologies
- Micro Processor
- E-Commerce & ERP
Practical Paper
Industrial Training

LPT Port Interaction
The LPT is commonly known as the Parallel port or Printer port. It is a pink colored 25 pin female connector at the back of a computer. Parallel port is so called because it transmits data in bytes and not bits. We can transmit one complete byte at a time, along with control signals for the distant device. This mechanism of transmitting bytes instead of bits greatly increases the rate of data transfer through this port. Because of these features the parallel port has become one of the most widely used for implementing projects dealing with control of real world peripherals.
The LPT is actually a group of three ports, data port, control port and status port. These ports enjoy three separate addresses. For a standard PC the port addresses are typically 378h, 379h, 37ah for data, status and control ports respectively, these addresses may differ depending upon whether it is an LPT1 Port or a LPT2 port, but the order remains same.
The 25 pins are divided among the ports in the following manner.
Pin Number |
Port No / Port Name |
Pin Name(s) |
18 – 25 |
Non |
Ground Pins |
2 – 9 |
0x378 / Data Port |
Data Pins |
10 – 13, 15 |
0x379 / Status Port |
Status Pins |
1, 14, 16, 17 |
0x37a / Control Port |
Control Pins |
The remaining pins are reserved for other use. The data pins are true logic, i.e. the output is the same as we put. In other words if we send true logic ( logic 1 or 5V signal ) the same will be reflected on the pins. There are some pins in the control port and the status pins that show inverted logic. This means that if we output a true signal ( logic 1 or 5V signal ) on the pin it will actually be reflected as a false (logic 0 or 0V signal). Pin number 1, 10, 14, 15, 17 are inverted logic pins. This makes the LPT a little bit more complicated than a serial port.
The LPT was primarily designed for printer interfacing, this required bi directional communication of information. The computer needs to read the printer status of the printer and the printer needs to get information to decide the mode of operation from the computer. Of the 25 pins 17 are active pins whereas the rest are ground (0 voltage always). Of these 17, 2 to 9 are the data pins. The remaining ones are the ones that are shown in the table
Pin Number |
Description (Port ) |
Type |
1 |
Strobe ( Control ) |
Inverted Logic |
10 |
ACK ( Status ) |
Inverted Logic |
11 |
Busy (Status ) |
True logic |
12 |
Paper Empty (Status ) |
True Logic |
13 |
Select ( Status ) |
True Logic |
14 |
Auto Feed (Control ) |
Inverted Logic |
15 |
Error (Status ) |
Inverted Logic |
16 |
Initialize Printer ( Control ) |
True Logic |
17 |
Select Input (Control ) |
Inverted Logic |
In this article we will interface a simple 7-segment LED array with the LPT. The 7-segment will display numbers 0- 9 in cyclic manner. The circuit for the same is as given below. Rightmost connected pin in the top row of the Figure. 1 is the second pin whereas the Leftmost connected pin is pin number 9 of the LPT.
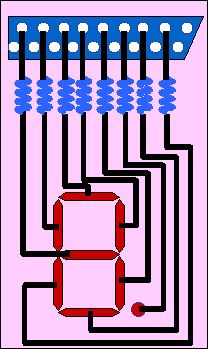
This was our circuit, for someone else this might change a little bit. The resistors we used were 560 ohm’s and the grounds were connected to pin 18 – 25.
The 7-Segments are separately controlled by 8 data pins of the LPT. To control each of these pins we need to send specific numbers. The format of these numbers is given below.
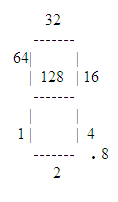
The numbers are the Bit that needs to be sent
through the LPT in order to glow that specific
filament of the 7-Segment.
These numbers activate only one pin of the LPT port at a
time. The result is that when we OR these numbers in a
specific format, we get control over each filament of the
7-Segment.
The program to run this circuit is given below:
# include <dos.h>
main( )
{
int i = 0 ;
unsigned char seg[ ] = {
64 | 1 | 2 | 4 | 16 | 32, /* 0 */
16 | 4, /* 1 */
32 | 16 | 128 | 1 | 2, /* 2 */
32 | 16 | 128 | 4 | 2, /* 3 */
64 | 128 | 16 | 4, /* 4 */
32 | 64 | 128 | 4 | 2, /* 5 */
32 | 64 | 1 | 2 | 4 | 128, /* 6 */
32 | 16 | 4, /* 7 */
32 | 64 | 128 | 4 | 2 | 1 | 16, /* 8 */
32 | 64 | 128 | 16 | 4 | 2 /* 9 */
} ;
while ( ! kbhit( ) )
{
outportb ( 0x378, seg[ i ] ) ;
delay ( 1000 ) ;
i++ ;
if ( i == 10 )
i = 0 ;
}
outportb ( 0x378, 0 ) ;
}
Again a word of caution these programs might not work properly under WinNT family of operating systems.