Theoretical Paper
- Computer Organization
- Data Structure
- Digital Electronics
- Object Oriented Programming
- Discrete Mathematics
- Graph Theory
- Operating Systems
- Software Engineering
- Computer Graphics
- Database Management System
- Operation Research
- Computer Networking
- Image Processing
- Internet Technologies
- Micro Processor
- E-Commerce & ERP
Practical Paper
Industrial Training
Arduino - Ultrasonic Sensor
PIR sensors allow you to sense motion. They are used to detect whether a human has moved in or out of the sensor’s range. They are commonly found in appliances and gadgets used at home or for businesses. They are often referred to as PIR, "Passive Infrared", "Pyroelectric", or "IR motion" sensors.
Following are the advantages of PIR Sensors −


Technical Specifications
-
Power Supply − +5V DC
Quiescent Current − < 2mA
Working Current − 15mA
Effectual Angle − < 15°
Ranging Distance − 2cm – 400 cm/1″ – 13ft
Resolution − 0.3 cm
Measuring Angle − 30 degree
Components Required
You will need the following components −
-
1 × Breadboard
1 × Arduino Uno R3
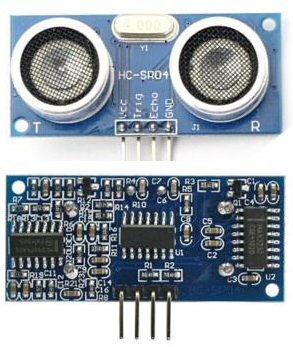
1 × ULTRASONIC Sensor (HC-SR04)
Procedure
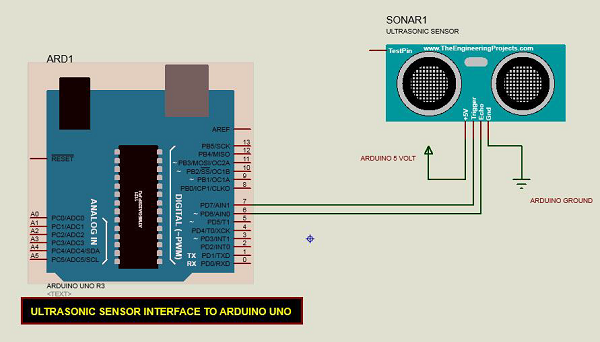
Follow the circuit diagram and make the connections as shown in the image given below.

Sketch
Open the Arduino IDE software on your computer. Coding in the Arduino language will control your circuit. Open a new sketch File by clicking New.

Arduino Code
const int pingPin = 7; // Trigger Pin of Ultrasonic Sensor
const int echoPin = 6; // Echo Pin of Ultrasonic Sensor

void setup() {
   Serial.begin(9600); // Starting Serial Terminal
}

void loop() {
   long duration, inches, cm;
   pinMode(pingPin, OUTPUT);
   digitalWrite(pingPin, LOW);
   delayMicroseconds(2);
   digitalWrite(pingPin, HIGH);
   delayMicroseconds(10);
   digitalWrite(pingPin, LOW);
   pinMode(echoPin, INPUT);
   duration = pulseIn(echoPin, HIGH);
   inches = microsecondsToInches(duration);
   cm = microsecondsToCentimeters(duration);
   Serial.print(inches);
   Serial.print("in, ");
   Serial.print(cm);
   Serial.print("cm");
   Serial.println();
   delay(100);
}

long microsecondsToInches(long microseconds) {
   return microseconds / 74 / 2;
}

long microsecondsToCentimeters(long microseconds) {
   return microseconds / 29 / 2;
}
Code to Note
The Ultrasonic sensor has four terminals - +5V, Trigger, Echo, and GND connected as follows −
-
Connect the +5V pin to +5v on your Arduino board.
Connect Trigger to digital pin 7 on your Arduino board.
Connect Echo to digital pin 6 on your Arduino board.
Connect GND with GND on Arduino.
In our program, we have displayed the distance measured by the sensor in inches and cm via the serial port.
Result
You will see the distance measured by sensor in inches and cm on Arduino serial monitor.

