Theoretical Paper
- Computer Organization
- Data Structure
- Digital Electronics
- Object Oriented Programming
- Discrete Mathematics
- Graph Theory
- Operating Systems
- Software Engineering
- Computer Graphics
- Database Management System
- Operation Research
- Computer Networking
- Image Processing
- Internet Technologies
- Micro Processor
- E-Commerce & ERP
Practical Paper
Industrial Training
Arduino - Temperature Sensor
The Temperature Sensor LM35 series are precision integrated-circuit temperature devices with an output voltage linearly proportional to the Centigrade temperature.
The LM35 device has an advantage over linear temperature sensors calibrated in Kelvin, as the user is not required to subtract a large constant voltage from the output to obtain convenient Centigrade scaling. The LM35 device does not require any external calibration or trimming to provide typical accuracies of ±¼°C at room temperature and ±¾°C over a full −55°C to 150°C temperature range.

Technical Specifications
-
Calibrated directly in Celsius (Centigrade)
Linear + 10-mV/°C scale factor
0.5°C ensured accuracy (at 25°C)
Rated for full −55°C to 150°C range
Suitable for remote applications
Components Required
You will need the following components −
-
1 × Breadboard
1 × Arduino Uno R3
1 × LM35 sensor
Procedure
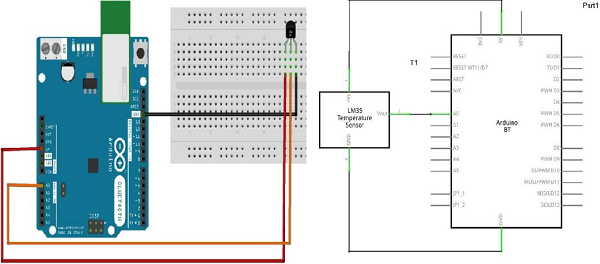
Follow the circuit diagram and hook up the components on the breadboard as shown in the image given below.

Sketch
Open the Arduino IDE software on your computer. Coding in the Arduino language will control your circuit. Open a new sketch File by clicking New.

Arduino Code
float temp;
int tempPin = 0;

void setup() {
   Serial.begin(9600);
}

void loop() {
   temp = analogRead(tempPin);
   // read analog volt from sensor and save to variable temp
   temp = temp * 0.48828125;
   // convert the analog volt to its temperature equivalent
   Serial.print("TEMPERATURE = ");
   Serial.print(temp); // display temperature value
   Serial.print("*C");
   Serial.println();
   delay(1000); // update sensor reading each one second
}
Code to Note
LM35 sensor has three terminals - Vs, Vout and GND. We will connect the sensor as follows −
-
Connect the +Vs to +5v on your Arduino board.
Connect Vout to Analog0 or A0 on Arduino board. Connect GND with GND on Arduino.
The Analog to Digital Converter (ADC) converts analog values into a digital approximation based on the formula ADC Value = sample * 1024 / reference voltage (+5v). So with a +5 volt reference, the digital approximation will be equal to input voltage * 205.
Result
You will see the temperature display on the serial port monitor which is updated every second.

