Theoretical Paper
- Computer Organization
- Data Structure
- Digital Electronics
- Object Oriented Programming
- Discrete Mathematics
- Graph Theory
- Operating Systems
- Software Engineering
- Computer Graphics
- Database Management System
- Operation Research
- Computer Networking
- Image Processing
- Internet Technologies
- Micro Processor
- E-Commerce & ERP
- Dart Programming
- Flutter Tutorial
- Numerical Methods Tutorials
- Flutter Tutorials
Practical Paper
Industrial Training

Flutter Table
A table allows the user to arrange the data in rows and columns. It is used to store and display our data in a structured format, which helps us to compare the pairs of related values easily.
Flutter also allows the user to create a table layout in the mobile application. We can create a table in Flutter using the Table widget that uses the table layout algorithm for its children. This widget has several properties to enhance or modify the table layout. These properties are: border, children, columnWidths, textDirection, textBaseline, etc.
When we use the Table widget?
A table widget can be used when we want to store multiple rows with the same column width, and each column(table) contains equal data. Flutter provides another approach for the same using the GridView widget.
To create a table, we must use the following things:
- First, we need to add a Table widget in the body.
- Next, we have to add TableRow(s) in children of the table widget. Since the table widget has multiple rows, so we use children, not child.
- Finally, we need to add TableCell(s) in children of TableRow widget. Now, we can write any widget in this place like we are going to use a Text widget.
TableRow(children: [
  TableCell(child: Text('javatpoint')),
  TableCell(
    child: Text('Flutter'),
  ),
  TableCell(child: Text('Android')),
  TableCell(child: Text('MySQL')),
]),
While using this widget, we must know these rules:
- This widget automatically decided the column width, which is equally divided between TableCells. If it is not equal, we will get an error that says every TableRow in a table must have the same number of children so that every cell is filled. Otherwise, the table will contain holes.
- Each row has the same height, which will be equal to the highest height of a TableCell.
- The children of a table can have only TableRow widgets.
Let us understand it with the help of an example given below where we try to cover each thing related with this widget:
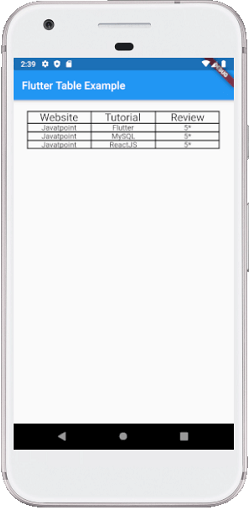
import 'package:flutter/material.dart';

void main() {runApp(MyApp());}

class MyApp extends StatefulWidget {
  @override
  _TableExample createState() => _TableExample();
}

class _TableExample extends State< MyApp> {
  @override
  Widget build(BuildContext context) {
    return MaterialApp(
      home: Scaffold(
          appBar: AppBar(
            title: Text('Flutter Table Example'),
          ),
          body: Center(
              child: Column(children: < Widget>[
                Container(
                  margin: EdgeInsets.all(20),
                  child: Table(
                    defaultColumnWidth: FixedColumnWidth(120.0),
                    border: TableBorder.all(
                        color: Colors.black,
                        style: BorderStyle.solid,
                        width: 2),
                    children: [
                      TableRow( children: [
                        Column(children:[Text('Website', style: TextStyle(fontSize: 20.0))]),
                        Column(children:[Text('Tutorial', style: TextStyle(fontSize: 20.0))]),
                        Column(children:[Text('Review', style: TextStyle(fontSize: 20.0))]),
                      ]),
                      TableRow( children: [
                        Column(children:[Text('Javatpoint')]),
                        Column(children:[Text('Flutter')]),
                        Column(children:[Text('5*')]),
                      ]),
                      TableRow( children: [
                        Column(children:[Text('Javatpoint')]),
                        Column(children:[Text('MySQL')]),
                        Column(children:[Text('5*')]),
                      ]),
                      TableRow( children: [
                        Column(children:[Text('Javatpoint')]),
                        Column(children:[Text('ReactJS')]),
                        Column(children:[Text('5*')]),
                      ]),
                    ],
                  ),
                ),
              ])
          )),
    );
  }
}
Output:
When we run the application in emulator or device, we will see the screenshot below:
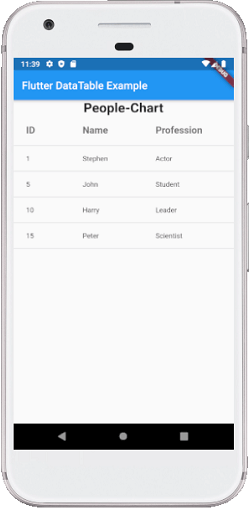
Flutter DataTable
Flutter also allows us another widget to create a table in our application named DataTable widget. It is a material design data table where we can display data with column labels and rows. This widget automatically adjusted the table's column according to the cell data. It is expensive to display data using this widget because here, all the data must be measured twice. First, it measured the dimensions for each column, and second, it actually lay out the table. So, we have to ensure that this widget can only be used when we have fewer rows.
DataTable widget stored information using columns and rows property. The columns property contains data using an array of DataColumn, and the rows property contains information using an array of DataRow. The DataRow has sub-property cells that take an array of DataCell. The DataColumn has a sub-property label that takes widgets as value. We can also provide Text, Image, Icon, or any other widget in the DataTable.
The following is the syntax of DataTable:
DataTable(
  columns: [
    DataColumn(label: ),
    DataColumn(label: )),
  ],
  rows: [
    DataRow(cells: [
      DataCell( ),
      DataCell( ),
      ...
      DataCell( ),
    ]),
    DataRow(cells: [
      DataCell( ),
      DataCell( ),
      ...
      DataCell( ),
    ]),
  ],
),
Example
Let us understand how to use DataTable in the Flutter app. Here, we will define a simple data table that has three column labels and four rows:
import 'package:flutter/material.dart';

void main() {runApp(MyApp());}

class MyApp extends StatefulWidget {
  @override
  _DataTableExample createState() => _DataTableExample();
}

class _DataTableExample extends State< MyApp> {
  @override
  Widget build(BuildContext context) {
    return MaterialApp(
      home: Scaffold(
          appBar: AppBar(
            title: Text('Flutter DataTable Example'),
          ),
          body: ListView(children: < Widget>[
            Center(
                child: Text(
                  'People-Chart',
                  style: TextStyle(fontSize: 25, fontWeight: FontWeight.bold),
                )),
            DataTable(
              columns: [
                DataColumn(label: Text(
                    'ID',
                    style: TextStyle(fontSize: 18, fontWeight: FontWeight.bold)
                )),
                DataColumn(label: Text(
                    'Name',
                    style: TextStyle(fontSize: 18, fontWeight: FontWeight.bold)
                )),
                DataColumn(label: Text(
                    'Profession',
                    style: TextStyle(fontSize: 18, fontWeight: FontWeight.bold)
                )),
              ],
              rows: [
                DataRow(cells: [
                  DataCell(Text('1')),
                  DataCell(Text('Stephen')),
                  DataCell(Text('Actor')),
                ]),
                DataRow(cells: [
                  DataCell(Text('5')),
                  DataCell(Text('John')),
                  DataCell(Text('Student')),
                ]),
                DataRow(cells: [
                  DataCell(Text('10')),
                  DataCell(Text('Harry')),
                  DataCell(Text('Leader')),
                ]),
                DataRow(cells: [
                  DataCell(Text('15')),
                  DataCell(Text('Peter')),
                  DataCell(Text('Scientist')),
                ]),
              ],
            ),
          ])
      ),
    );
  }
}
Output:
When we run the application in emulator or device, we will see the screenshot below: