Theoretical Paper
- Computer Organization
- Data Structure
- Digital Electronics
- Object Oriented Programming
- Discrete Mathematics
- Graph Theory
- Operating Systems
- Software Engineering
- Computer Graphics
- Database Management System
- Operation Research
- Computer Networking
- Image Processing
- Internet Technologies
- Micro Processor
- E-Commerce & ERP
- Dart Programming
- Flutter Tutorial
- Numerical Methods Tutorials
- Flutter Tutorials
Practical Paper
Industrial Training

Flutter Testing
Testing is an activity, which is used for verifying and validating a software or application that is bug-free and meets the user requirements. It ensures that the actual result matches the expected result. It also helps to improve the software or application in terms of efficiency, usability, and accuracy.
Testing is one of the most important phases in the application development life cycle to ensure the application is of high quality. It is the most consuming phase in the application or software development.
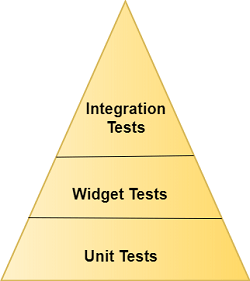
Flutter framework provides excellent support for the automated testing of an application. Generally, automated testing categorizes into three types to completely test an application. They are as follows:
- Unit Testing
- Widget Testing
- Integration testing
Unit Testing
It is the easiest method for testing an application or software. It tests a single function, method, or class. The goal of unit testing is to ensure the correctness of code under a variety of conditions. Generally, unit testing does not interact with user input, render on the screen, read or write data from the disk, and do not use external dependencies by default. When you use external dependencies, they are mocked out with packages like Mockito.
Widget Testing
Widget testing is used to tests a single widget. The goal of this testing is to ensure that the widget's UI looks and interacts with other widgets as expected. The process of widget testing is similar to unit testing, but it is more comprehensive than a unit test. This testing involves multiple classes and requires a test environment to find more bugs. A widget, which is being tested, can receive and responds to user actions and events and able to instantiates the child widgets.
Integration Testing
An integration testing involves both the above testing along with the external components of the application. It validates a complete app or a large part of the app. The purpose of integration testing is to ensure that all the widgets and services work together as expected. It can also use to verify the app's performance. Generally, integration testing runs on real devices such as Android emulator or iOS simulator.
The trade-offs between different type of testing are given below:
| Unit Testing | Widget Testing | Integration Testing | |
| Confidence | Low | Higher | Highest |
| Maintenance | Cost | Low Higher | Highest |
| Dependencies | Few | More | Most |
| Execution Speed | Quick | Quick | Slow |
We know that, in Flutter, everything is a widget. So, here, we are going to discuss the widget testing in detail.
Introduction to Widget Testing
In widget testing, you need some additional tools provided by the flutter_test package. This package provides the following tools to test the widget.
- WidgetTester: It allows for building and interacting with widgets in a test environment.
- testWidgets(): This method automatically creates a WidgetTester for each test case. It is used as a normal test() function. It accepts two arguments: test description and test code.
- Finder class: It is used to search widgets in the test environment.
- Matcher class: It helps to verify whether a Finder class locates a single widget or multiple widgets in the test environment.
Let us learn how all of the above fit together with the following steps:
Step 1: Add the flutter_test dependency.
In the first step, we need to add a flutter_test dependency in the pubspec.yaml file. By default, it is already added to the dependency section.
Step 2: Create a widget to test.
Next, we have to create a widget for performing testing. The below code snippet creates a widget which contains title and message to display on the screen.
class MyAppWidget extends StatelessWidget {
  final String title;
  final String message;

  const MyWidget({
    Key key,
    @required this.title,
    @required this.message,
  }) : super(key: key);

  @override
  Widget build(BuildContext context) {
    return MaterialApp(
      title:  'Flutter Testing Demo',
      home: Scaffold(
        appBar: AppBar(
          title: Text(title),
        ),
        body: Center(
          child: Text(message),
        ),
      ),
    );
  }
}
Step 3: Create a testWidgets test.
To test the widget, use testWidget() method. This method allows us to define a test and accept two arguments: test description and test code. It also creates a WidgetTester to work with the widget. The following code verifies that MyAppWidget displays the title and message.
void main() {
  testWidgets( ' The widget contains a title and message', (WidgetTester tester) async {
    // Write test code here.
  });
}
Step 4: Build the widget using the WidgetTester.
The WidgetTester provides a pumpWidget() method to build and render the provided widget. It creates the instance of MyAppWidget that displays The 'Ti' and 'Msg' as the title and message, respectively. The following code explains it more clearly.
void main() {
    testWidgets(The widget contains a title and message', (WidgetTester tester) async {
        await tester.pumpWidget(MyWidget(title:  'Ti', message:  'Msg'));

  });
}
Step 5: Search for the widget using a Finder.
In this step, we will use the Finder class to search the widget tree for the title and message. It allows us to verify that the widget is displayed correctly. To do this, we need to use the find.text() method.
void main() {
    testWidgets(The widget contains a title and message', (WidgetTester tester) async {
    await tester.pumpWidget(MyWidget(title:  'Ti', message:  'Msg'));

    final titleFinder = find.text( 'Ti');
    final messageFinder = find.text( 'Msg');

  });
}
Step 6: Verify the widget using a Matcher.
Finally, we need to verify the text message appears on the screen by using the Matcher class. It ensures that the widget appears on the screen exactly once. We can see the following code to understand it.
void main() {
    testWidgets(The widget contains a title and message', (WidgetTester tester) async {
    await tester.pumpWidget(MyWidget(title:  'Ti', message:  'Msg'));

    final titleFinder = find.text( 'Ti');
    final messageFinder = find.text( 'Msg');

    expect(titleFinder, findsOneWidget);
    expect(messageFinder, findsOneWidget);
  });
}
Now, we will see the working example to understand the concept of widget testing. First, create a project in Android Studio and navigate to the test folder of the project directory. Now, open the widget_test.dart file and replace the following code:
import  'package:flutter/material.dart';
import  'package:flutter_test/flutter_test.dart';

void main() {
    testWidgets(The widget contains a title and message', (WidgetTester tester) async {
    // Create the widget by telling the tester to build it.
    await tester.pumpWidget(MyWidget(title:  'Ti', message:  'Msg'));

    // Create the Finders.
    final titleFinder = find.text( 'Ti');
    final messageFinder = find.text( 'Msg');

    expect(titleFinder, findsOneWidget);
    expect(messageFinder, findsOneWidget);
  });
}

class MyAppWidget extends StatelessWidget {
  final String title;
  final String message;

  const MyAppWidget({
    Key key,
    @required this.title,
    @required this.message,
  }) : super(key: key);

  @override
  Widget build(BuildContext context) {
    return MaterialApp(
      title:  'Flutter Testing Demo',
      home: Scaffold(
        appBar: AppBar(
          title: Text(title),
        ),
        body: Center(
          child: Text(message),
        ),
      ),
    );
  }
}
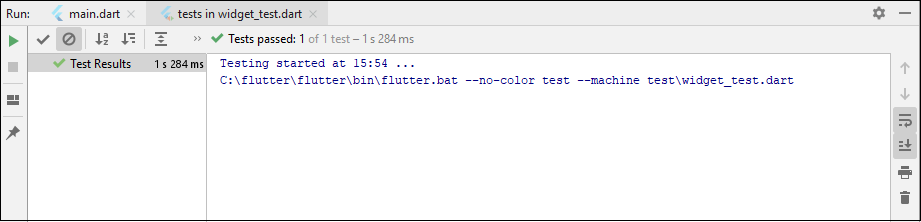
To perform testing, go to the Run menu and select the "test in widget_test.dart" option. It will run the test and give the result as the following screen: