Theoretical Paper
- Computer Organization
- Data Structure
- Digital Electronics
- Object Oriented Programming
- Discrete Mathematics
- Graph Theory
- Operating Systems
- Software Engineering
- Computer Graphics
- Database Management System
- Operation Research
- Computer Networking
- Image Processing
- Internet Technologies
- Micro Processor
- E-Commerce & ERP
- Dart Programming
- Flutter Tutorial
- Numerical Methods Tutorials
- Flutter Tutorials
Practical Paper
Industrial Training

Flutter Calendar
A calendar is a system used to organize the days, weeks, or months for commercial, religious, social, or administrative purposes. It keeps a record about which events fall on a particular date and when the special events will happen. In this section, we are going to explain how to display and use the calendar widget in our Flutter application.
Flutter provides a simple widget named table_calendar to show the calendar in our app. The table calendar is highly customizable and has many features, such as gesture, animation, and multiple formats.
The table_calendar provides many features, which are given below:
- It is easy to use API.
- It provides Custom Builders for UI control.
- It has vertical auto-sizing.
- It provides beautiful animations.
- It provides gesture handling.
- It provides multiple calendar formats such as a month, weak, year, etc.
- We can also use multiple days of the week formats.
Let see step by step to create and display the calendar.
Step 1: Create a new Flutter project in the IDE you are using and give its title as Flutter Calendar Example.
Step 2: Open the project, navigate to the lib folder, and open the pubspec.yaml file. In this file, we need to add the table_calendar dependency as below:
dependencies:
  flutter:
    sdk: flutter
  table_calendar: ^2.1.0
Step 3: After adding the above dependency, we need to run the below command to get the required packages:
$ flutter pub get
Step 4: Next, import the dependency in the dart file as below:
import 'package:syncfusion_flutter_calendar/calendar.dart';
Step 5: After this, we need a calendar controller and initialize the calendar as CalendarController.
CalendarController _controller;

@override
void initState() {
  super.initState();
  _controller = CalendarController();
}
Step 6: Next, we have to add the calendar widget as a child of any widget. Here, we are going to add the calendar widget as a child of the scaffold widget.
@override
Widget build(BuildContext context) {
  return Scaffold(
    body: SingleChildScrollView(
      child: Column(
        children: < Widget>[
          TableCalendar()
        ],
      ),
    ),
  );
Step 7: Now, we can write our logic and add styling to display the calendar.
Example
Below is the complete code to display the calendar in the app.
import 'package:flutter/material.dart';
import 'package:table_calendar/table_calendar.dart';

void main() => runApp(MyApp());

class MyApp extends StatelessWidget {
  @override
  Widget build(BuildContext context) {
    return MaterialApp(
      theme: ThemeData(
        primarySwatch: Colors.green,
      ),
      home: HomeCalendarPage(),
    );
  }
}

class HomeCalendarPage extends StatefulWidget {
  @override
  _HomeCalendarPageState createState() => _HomeCalendarPageState();
}

class _HomeCalendarPageState extends State< HomeCalendarPage> {
  CalendarController _controller;

  @override
  void initState() {
    super.initState();
    _controller = CalendarController();
  }

  @override
  Widget build(BuildContext context) {
    return Scaffold(
      appBar: AppBar(
        title: Text('Flutter Calendar Example'),
      ),
      body: SingleChildScrollView(
        child: Column(
          crossAxisAlignment: CrossAxisAlignment.start,
          children: < Widget>[
            TableCalendar(
              initialCalendarFormat: CalendarFormat.month,
              calendarStyle: CalendarStyle(
                  todayColor: Colors.blue,
                  selectedColor: Theme.of(context).primaryColor,
                  todayStyle: TextStyle(
                      fontWeight: FontWeight.bold,
                      fontSize: 22.0,
                      color: Colors.white)
              ),
              headerStyle: HeaderStyle(
                centerHeaderTitle: true,
                formatButtonDecoration: BoxDecoration(
                  color: Colors.brown,
                  borderRadius: BorderRadius.circular(22.0),
                ),
                formatButtonTextStyle: TextStyle(color: Colors.white),
                formatButtonShowsNext: false,
              ),
              startingDayOfWeek: StartingDayOfWeek.monday,
              onDaySelected: (date, events) {
                print(date.toUtc());
              },
              builders: CalendarBuilders(
                selectedDayBuilder: (context, date, events) => Container(
                    margin: const EdgeInsets.all(5.0),
                    alignment: Alignment.center,
                    decoration: BoxDecoration(
                        color: Theme.of(context).primaryColor,
                        borderRadius: BorderRadius.circular(8.0)),
                    child: Text(
                      date.day.toString(),
                      style: TextStyle(color: Colors.white),
                    )),
                todayDayBuilder: (context, date, events) => Container(
                    margin: const EdgeInsets.all(5.0),
                    alignment: Alignment.center,
                    decoration: BoxDecoration(
                        color: Colors.blue,
                        borderRadius: BorderRadius.circular(8.0)),
                    child: Text(
                      date.day.toString(),
                      style: TextStyle(color: Colors.white),
                    )),
              ),
              calendarController: _controller,
            )
          ],
        ),
      ),
    );
  }
}
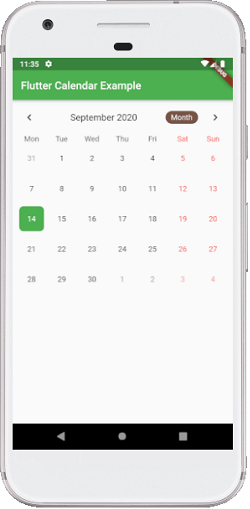
Output:
When we run the app in the device or emulator, we should see the UI similar to the below screenshot. Here, we can see the previous and next arrow icon to display the month. The week starts from Monday, and date 14 is my current date.
If we select another date, we can see that the current date and selected date are in a different color. See the below image.

We can also display the week of the month, as shown in this image.
