Theoretical Paper
- Computer Organization
- Data Structure
- Digital Electronics
- Object Oriented Programming
- Discrete Mathematics
- Graph Theory
- Operating Systems
- Software Engineering
- Computer Graphics
- Database Management System
- Operation Research
- Computer Networking
- Image Processing
- Internet Technologies
- Micro Processor
- E-Commerce & ERP
- Dart Programming
- Flutter Tutorial
- Numerical Methods Tutorials
- Flutter Tutorials
Practical Paper
Industrial Training
Flutter Animation
The animation is a very powerful and important concept in Flutter. We cannot imagine any mobile app without animations. When you tap on a button or move from one page to another page are all animations. Animations enhance user experiences and make the applications more interactive.
Flutter provides excellent support for animation and can separate the animation into two main categories, which are given below:
- Tween Animation
- Physics-based Animation
Tween Animation
It is the short form of in-betweening. In a tween animation, it is required to define the start and endpoint of animation. It means the animation begins with start value, then goes through a series of intermediate values and finally reached the end value. It also provides the timeline and curve, which defines the time and speed of the transition. The widget framework provides a calculation of how to transition from the start and endpoint.
Example
ColorTween {
    begin: color.green,
    end: color.blue,
}
Physics-based Animation
It is a type of animation which allows you to make an app interaction feels realistic and interactive. It simulates the real-world animation/movement, such as you want to animate a widget like spring, falling, or swinging with gravity. Thus, it is an animation that animates in response to user input/movement. The simplest example is the time of flight, and the distance of travel covered will be calculated according to the laws of physics.
Flutter provides two types of techniques for animation. These techniques are:
- Implicit Animation
- Explicit Animation
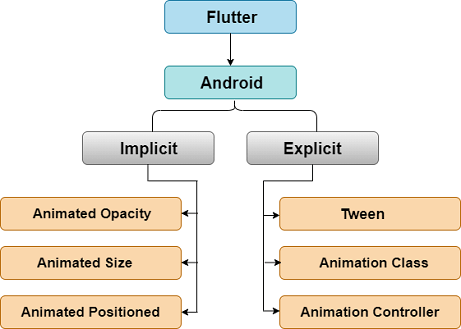
The following figure sets out the animation hierarchy in Flutter and explains it more clearly about the implicit and explicit animation.

Now, we are going to see how we can create explicit animation in Flutter. There are mainly three pillars of an animation, which are given below:
- Ticker
- Animation Class
- AnimationController
Ticker
The Ticker is a class which sends a signal at a regular interval, i.e., around 60 times per second. You can understand it with your watch, which tics at regular intervals. At each tick, Ticker provides a callback method with the duration since the first ticks at each second, after it was started. Even if the tickers started at different times, it always synchronized automatically. The reason behind this is that the tickers give their elapsed time relative to the first tick after it was started.
Animation
The Animation class is the core building block of the animation system. The animation is nothing else, but it represents a value (specific type) that can change over the lifetime of an animation. In Flutter, the widgets which perform an animation take an animation object as a parameter. This Animation object gives the information from which they read the current value of the animation and to which they listen for changes to that value. The animation class contains two methods addListener() and addStatusListener(). When the value of animation changes, it notifies all the listeners added with addListener(). Again, when the status of the animation changes, it notifies all the listeners added with addStatusListener().
The most common Animation classes are:
- Animation< double>: It interpolates values between two decimal numbers over a certain duration.
- Animation< Color>: It interpolates colors between two color values.
- Animation< Size>: It interpolates sizes between two size values.
Animation Controller
The animation controller is a class that allows us to control the animation. It always generates new values whenever the application is ready for a new frame. For example, it gives the controlling of start, stop, forward, or repeat of the animation. Once the animation controller is created, we can start building other animation based on it, such as reverse animation and curved animation.
animcontroller = AnimationController(vsync: this, duration: Duration(milliseconds: 2500));
Here, the duration option controls the duration of the animation process, and vsync option is used to optimize the resource used in the animation.
The basic steps necessary for using an AnimationController are:
Step 1: First, instantiate an AnimationController with parameters, such as duration and vsync.
Step 2: Add the required listeners like addListener() or addStatusListener().
Step 3: Start the animation.
Step 4: Perform the action in the listener callback methods (for example, setState).
Step 5: Last, dispose of the animation.
Let us see a simple animation example, which uses an animation class and animation controller. The following example shows the tween animation that gives the start and endpoint of animation. Open the project and replace the following code in the main.dart file.
import 'package:flutter/animation.dart';
import 'package:flutter/material.dart';

void main() => runApp(MyApp());

class MyApp extends StatelessWidget {
  // This widget is the root of your application.
  @override
  Widget build(BuildContext context) {
    return MaterialApp(
      title: 'Flutter Animation',
      theme: ThemeData(
        // This is the theme of your application.
        primarySwatch: Colors.blue,
      ),
      home: MyHomePage(),
    );
  }
}
class MyHomePage extends StatefulWidget {
  _HomePageState createState() => _HomePageState();
}
class _HomePageState extends State< MyHomePage> with SingleTickerProviderStateMixin {
  Animation< double> animation;
  AnimationController animationController;
  @override
  void initState() {
    super.initState();
    animationController = AnimationController(vsync: this, duration: Duration(milliseconds: 2500));
    animation = Tween< double>(begin: 0.0, end: 1.0).animate(animationController);
    animation.addListener((){
      setState((){
        print (animation.value.toString());
      });
    });
    animation.addStatusListener((status){
      if(status == AnimationStatus.completed){
        animationController.reverse();
      } else if(status == AnimationStatus.dismissed) {
        animationController.forward();
        }
      });
      animationController.forward();
    }
  @override
  Widget build(BuildContext context) {
    return Center(
      child: AnimatedLogo(
        animation: animation,
      )
    );
  }
}
class AnimatedLogo extends AnimatedWidget {
  final Tween< double> _sizeAnimation = Tween< double> (begin: 0.0, end: 500.0);
  AnimatedLogo({Key key, Animation animation}):super(key: key, listenable: animation);
  @override
  Widget build(BuildContext context) {
    final Animation< double> animation = listenable;
    return Transform.scale(
      scale: _sizeAnimation.evaluate(animation),
      child: FlutterLogo(),
    );
  }
}
Output
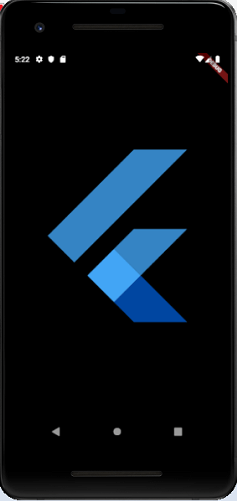
When you run the application in Android Studio, you will get the output. In the screen, you will see that the Flutter logo scaling in forward and reverse direction.

Curved Animation
The curved animation is very useful when you need to apply a non-linear curve with an animation object. Thus, it defines the animation's progress as a non-linear curve.
Syntax:
CurvedAnimation(parent: animationController, curve: Curves.bounceOut));
Let us understand it with the previous example. To add a curve, open the previous app in the android studio and add CurvedAnimation instead of animationController. Or replace the following line:
animation = Tween(begin: 0.0, end: 1.0).animate(animationController);
With the line below.
animation = Tween(begin: 0.0, end: 1.0).animate(animationController);
Now, when you run the app, you will see a bouncing effect with the Flutter logo during scaling in forward and reverse direction.
Hero Animation
A hero animation is a type of animation where an element of one screen flies to a new screen when the app goes to the next page. We can understand it with the following example where an animation takes an element like icon/image, and once you tap on the icon, the screen flies to the next page. The following example explains it more clearly.
Open the Flutter app and replace the following code in the main.dart file.
import 'package:flutter/material.dart';

void main() => runApp(MyApp());

class MyApp extends StatelessWidget {
  // This widget is the root of your application.
  @override
  Widget build(BuildContext context) {
    return MaterialApp(
      title: 'Flutter Application',
      theme: ThemeData(
        primarySwatch: Colors.orange,
      ),
      home: HeroAnimation(title: 'Hero Animation'),
    );
  }
}

class HeroAnimation extends StatefulWidget {
  HeroAnimation({Key key, this.title}) : super(key: key);
  final String title;

  @override
  _HeroAnimationState createState() => _HeroAnimationState();
}

class _HeroAnimationState extends State< HeroAnimation> {

  Widget _greenRectangle() {
    return Container(
      width: 75,
      height: 75,
      color: Colors.green,
    );
  }

  Widget _detailPageRectangle() {
    return Container(
      width: 150,
      height: 150,
      color: Colors.red,
    );
  }

  @override
  Widget build(BuildContext context) {
    return Scaffold(
      appBar: AppBar(
        title: Text(widget.title),
      ),
      body: buildDemoWidget(context),
    );
  }

  Widget buildDemoWidget(BuildContext context) {
    return Center(
      child: Column(
        crossAxisAlignment: CrossAxisAlignment.start,
        children: < Widget>[
          SizedBox(
            height: 30.0,
          ),
          ListTile(
            leading: GestureDetector(
              child: Hero(
                tag: 'hero-rectangle',
                child: _greenRectangle(),
              ),
              onTap: () => _gotoDetailsPage(context),
            ),
            title: Text('Tap on the green icon rectangle to analyse hero animation transition.'),
          ),
        ],
      ),
    );
  }

  void _gotoDetailsPage(BuildContext context) {
    Navigator.of(context).push(MaterialPageRoute(
      builder: (ctx) => Scaffold(
        body: Center(
          child: Column(
            mainAxisAlignment: MainAxisAlignment.center,
            children: < Widget>[
              Hero(
                tag: 'hero-rectangle',
                child: _detailPageRectangle(),
              ),
              Text('This is a place where you can see details about the icon tapped at previous page.'),
            ],
          ),
        ),
      ),
    ));
  }
}
Output
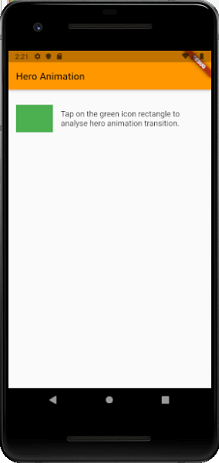
When you run the application in Android Studio, you will get the following screen.

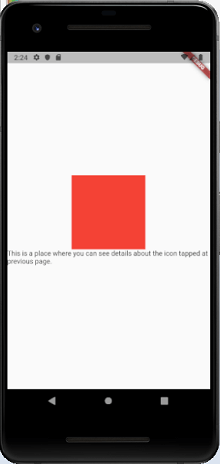
To show the hero animation, tap on the green icon, it will immediately fly to a new screen where you will get the details about the tapped item.


