Theoretical Paper
- Computer Organization
- Data Structure
- Digital Electronics
- Object Oriented Programming
- Discrete Mathematics
- Graph Theory
- Operating Systems
- Software Engineering
- Computer Graphics
- Database Management System
- Operation Research
- Computer Networking
- Image Processing
- Internet Technologies
- Micro Processor
- E-Commerce & ERP
- Dart Programming
- Flutter Tutorial
- Numerical Methods Tutorials
- Flutter Tutorials
Practical Paper
Industrial Training

Flutter Drawer
The mobile apps that use Material Design have two primary options for navigation. These navigations are Tabs and Drawers. A drawer is an alternative option for tabs because sometimes the mobile apps do not have sufficient space to support tabs.
A drawer is an invisible side screen. It is a sliding left menu that generally contains important links in the application and occupies half of the screen when displayed.
Let us see how the drawer works in a Flutter. Flutter uses a drawer widget to create a sliding left menu layout with a Material Design widget. The following steps are required to use a drawer in the app.
- Create a Flutter Project.
- Add drawer in scaffold widget
- Populate the drawer by adding content
- Close the drawer.
Step 1: Create a Flutter project in the IDE. Here, I am going to use Android Studio.
Step 2: Open the project in Android Studio and navigate to the lib folder. In this folder, open the main.dart file.
Step 3: In the main.dart file, create a drawer in the scaffold widget as the code given below.
Scaffold(
  drawer: Drawer(
    child: // Populate the Drawer by adding content in the next step.
  )
);
Step 4: Next, we need to add content in the drawer. In this example, we are going to use the Listview widget that allows the users to scroll through the drawer if the content does not fit in the screen supports. The following code explains it more clearly.
Drawer(
  child: ListView(
    padding: EdgeInsets.zero,
    children: [
      DrawerHeader(
        child: Text('Drawer Header'),
        decoration: BoxDecoration(
          color: Colors.blue,
        ),
      ),
      ListTile(
        title: Text('Item 1'),
        onTap: () {
          // Update the state of the app.
          // ...
        },
      ),
      ListTile(
        title: Text('Item 2'),
        onTap: () {
          // Update the state of the app.
          // ...
        },
      ),
    ],
  ),
);
Step 5: Finally, close the drawer. We can do this by using the navigator.
Let us see the complete code of the above steps. Open the main.dart file and replace the following code.
import 'package:flutter/material.dart';

void main() => runApp(MyApp());

class MyApp extends StatelessWidget {
  final appTitle = 'Flutter Drawer Demo';

  @override
  Widget build(BuildContext context) {
    return MaterialApp(
      title: appTitle,
      home: MyHomePage(title: appTitle),
    );
  }
}

class MyHomePage extends StatelessWidget {
  final String title;

  MyHomePage({Key key, this.title}) : super(key: key);

  @override
  Widget build(BuildContext context) {
    return Scaffold(
      appBar: AppBar(title: Text(title)),
      body: Center(child: Text(
          'A drawer is an invisible side screen.',
          style: TextStyle(fontSize: 20.0),
          )
      ),
      drawer: Drawer(
        child: ListView(
          // Important: Remove any padding from the ListView.
          padding: EdgeInsets.zero,
          children: < Widget>[
            UserAccountsDrawerHeader(
              accountName: Text("Abhishek Mishra"),
              accountEmail: Text("abhishekm977@gmail.com"),
              currentAccountPicture: CircleAvatar(
                backgroundColor: Colors.orange,
                child: Text(
                  "A",
                  style: TextStyle(fontSize: 40.0),
                ),
              ),
            ),
            ListTile(
              leading: Icon(Icons.home), title: Text("Home"),
              onTap: () {
                Navigator.pop(context);
              },
            ),
            ListTile(
              leading: Icon(Icons.settings), title: Text("Settings"),
              onTap: () {
                Navigator.pop(context);
              },
            ),
            ListTile(
              leading: Icon(Icons.contacts), title: Text("Contact Us"),
              onTap: () {
                Navigator.pop(context);
              },
            ),
          ],
        ),
      ),
    );
  }
}
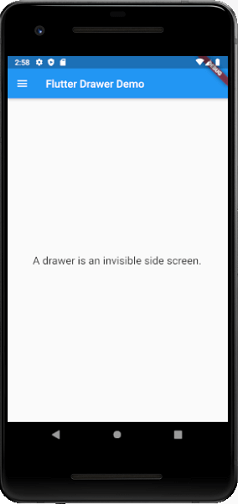
Output
Now, run the app in Android Studio. It will give the following screen.
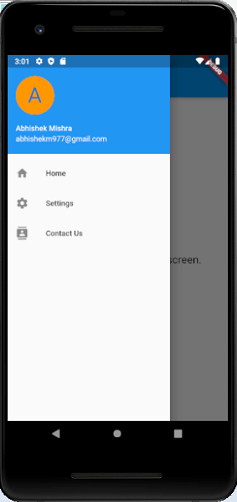
When you click on the top left corner of the above screen, you can see the drawer sliding left that generally contains important links in the application and occupies half of the screen.