Theoretical Paper
- Computer Organization
- Data Structure
- Digital Electronics
- Object Oriented Programming
- Discrete Mathematics
- Graph Theory
- Operating Systems
- Software Engineering
- Computer Graphics
- Database Management System
- Operation Research
- Computer Networking
- Image Processing
- Internet Technologies
- Micro Processor
- E-Commerce & ERP
- Dart Programming
- Flutter Tutorial
- Numerical Methods Tutorials
- Flutter Tutorials
Practical Paper
Industrial Training
Flutter Lists
Lists are the most popular elements of every web or mobile application. They are made up of multiple rows of items, which include text, buttons, toggles, icons, thumbnails, and many more. We can use it for displaying various information such as menus, tabs, or to break the monotony of pure text files.
In this section, we are going to learn how we can work with Lists in the Flutter. Flutter allows you to work with Lists in different ways, which are given below:
- Basic Lists
- Long Lists
- Grid Lists
- Horizontal Lists
Let us see all the above lists one by one.
Basic Lists
Flutter includes a ListView widget for working with Lists, which is the fundamental concept of displaying data in the mobile apps. The ListView is a perfect standard for displaying lists that contains only a few items. ListView also includes ListTitle widget, which gives more properties for the visual structure to a list of data.
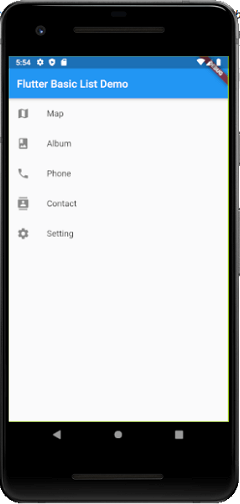
The following example displays a basic list in the Flutter application.
import 'package:flutter/material.dart';

void main() => runApp(MyApp());

class MyApp extends StatelessWidget {
  @override
  Widget build(BuildContext context) {
    final appTitle = 'Flutter Basic List Demo';

    return MaterialApp(
      title: appTitle,
      home: Scaffold(
        appBar: AppBar(
          title: Text(appTitle),
        ),
        body: ListView(
          children: < Widget>[
            ListTile(
              leading: Icon(Icons.map),
              title: Text('Map'),
            ),
            ListTile(
              leading: Icon(Icons.photo_album),
              title: Text('Album'),
            ),
            ListTile(
              leading: Icon(Icons.phone),
              title: Text('Phone'),
            ),
            ListTile(
              leading: Icon(Icons.contacts),
              title: Text('Contact'),
            ),
            ListTile(
              leading: Icon(Icons.settings),
              title: Text('Setting'),
            ),
          ],
        ),
      ),
    );
  }
}
Output
Now, run the app in Android Studio. You can see the following screen in your emulator or connected device.
>
Working with Long Lists
Sometimes you want to display a very long list in a single screen of your app, then, in that case, the above method for displaying the lists is not perfect. To work with a list that contains a very large number of items, we need to use a ListView.builder() constructor. The main difference between ListView and ListView.builder is that ListView creates all items at once, whereas the ListView.builder() constructor creates items when they are scrolled onto the screen.
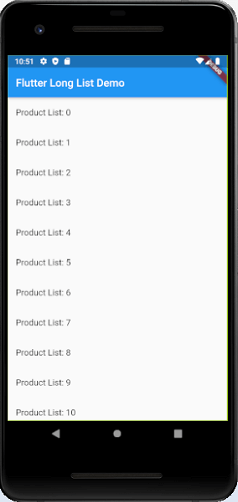
Let us see the following example. Open the main.dart file and replace the following code.
import 'package:flutter/material.dart';

void main() {
  runApp(MyApp(
    products: List.generate(500, (i) => "Product List: $i"),
  ));
}

class MyApp extends StatelessWidget {
  final List products;

  MyApp({Key key, @required this.products}) : super(key: key);

  @override
  Widget build(BuildContext context) {
    final appTitle = 'Flutter Long List Demo';

    return MaterialApp(
      title: appTitle,
      home: Scaffold(
        appBar: AppBar(
          title: Text(appTitle),
        ),
        body: ListView.builder(
          itemCount: products.length,
          itemBuilder: (context, index) {
            return ListTile(
              title: Text('${products[index]}'),
            );
          },
        ),
      ),
    );
  }
}
In the above code, the itemCount gives how many numbers of items you want to display in a list. The itemBuilder tells about where you want to return the item that you want to display.
Output
Now, run the app in Android Studio. You will get the following screen where you can see all product list by scrolling onto the screen.

Creating a Grid Lists
Sometimes we want to display the items in a grid layout rather than the normal list that comes one after next. A GridView widget allows you to create a grid list in Flutter. The simplest way to create a grid is by using the GridView.count() constructor, which specifies the number of rows and columns in a grid.
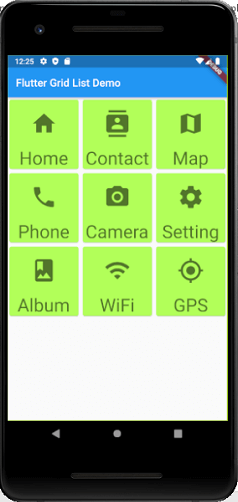
Let us see the following example of how GridView works in Flutter for creating grid lists. Open the main.dart file and insert the following code.
import 'package:flutter/material.dart';

void main() {runApp(MyApp());}

class MyApp extends StatelessWidget {
  @override
  Widget build(BuildContext context) {
    final appTitle = "Flutter Grid List Demo";

    return MaterialApp(
        title: appTitle,
        home: Scaffold(appBar: AppBar(
          title: Text(appTitle),
        ),
            body: GridView.count(
                crossAxisCount: 3,
                children: List.generate(choices.length, (index) {
                  return Center(
                    child: SelectCard(choice: choices[index]),
                  );
                }
                )
            )
        )
    );
  }
}

class Choice {
  const Choice({this.title, this.icon});
  final String title;
  final IconData icon;
}

const List< Choice> choices = const < Choice>[
  const Choice(title: 'Home', icon: Icons.home),
  const Choice(title: 'Contact', icon: Icons.contacts),
  const Choice(title: 'Map', icon: Icons.map),
  const Choice(title: 'Phone', icon: Icons.phone),
  const Choice(title: 'Camera', icon: Icons.camera_alt),
  const Choice(title: 'Setting', icon: Icons.settings),
  const Choice(title: 'Album', icon: Icons.photo_album),
  const Choice(title: 'WiFi', icon: Icons.wifi),
  const Choice(title: 'GPS', icon: Icons.gps_fixed),
];

class SelectCard extends StatelessWidget {
  const SelectCard({Key key, this.choice}) : super(key: key);
  final Choice choice;

  @override
  Widget build(BuildContext context) {
    final TextStyle textStyle = Theme.of(context).textTheme.display1;
    return Card(
        color: Colors.lightGreenAccent,
        child: Center(child: Column(
            mainAxisSize: MainAxisSize.min,
            crossAxisAlignment: CrossAxisAlignment.center,
            children: < Widget>[
              Expanded(child: Icon(choice.icon, size:50.0, color: textStyle.color)),
              Text(choice.title, style: textStyle),
            ]
        ),
        )
    );
  }
}
Output
Now, run the app in Android Studio. You can see the following screen in your Android Emulator.

Creating a Horizontal List
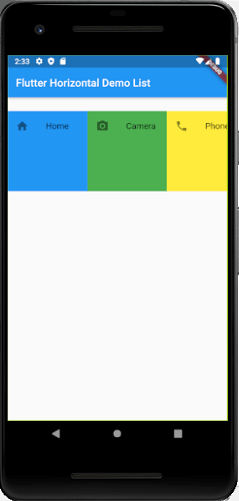
The ListView widget also supports horizontal lists. Sometimes we want to create a list that can scroll horizontally rather than vertically. In that case, ListView provides the horizontal scrollDirection that overrides the vertical direction. The following example explains it more clearly. Open the main.dart file and replace the following code.
import 'package:flutter/material.dart';

void main() => runApp(MyApp());

class MyApp extends StatelessWidget {
  @override
  Widget build(BuildContext context) {
    final title = 'Flutter Horizontal Demo List';

    return MaterialApp(
      title: title,
      home: Scaffold(
        appBar: AppBar(
          title: Text(title),
        ),
        body: Container(
          margin: EdgeInsets.symmetric(vertical: 25.0),
          height: 150.0,
          child: ListView(
            scrollDirection: Axis.horizontal,
            children: < Widget>[
              Container(
                width: 150.0,
                color: Colors.blue,
                child: new Stack(
                  children: < Widget>[
                    ListTile(
                      leading: Icon(Icons.home),
                      title: Text('Home'),
                    ),
                  ],
                ),
              ),
              Container(
                width: 148.0,
                color: Colors.green,
                child: new Stack(
                  children: < Widget>[
                    ListTile(
                      leading: Icon(Icons.camera_alt),
                      title: Text('Camera'),
                    ),
                  ],
                ),
              ),
              Container(
                width: 148.0,
                color: Colors.yellow,
                child: new Stack(
                  children: < Widget>[
                    ListTile(
                      leading: Icon(Icons.phone),
                      title: Text('Phone'),
                    ),
                  ],
                ),
              ),
              Container(
                width: 148.0,
                color: Colors.red,
                child: new Stack(
                  children: < Widget>[
                    ListTile(
                      leading: Icon(Icons.map),
                      title: Text('Map'),
                    ),
                  ],
                ),
              ),
              Container(
                width: 148.0,
                color: Colors.orange,
                child: new Stack(
                  children: < Widget>[
                    ListTile(
                      leading: Icon(Icons.settings),
                      title: Text('Setting'),
                    ),
                  ],
                ),
              ),
            ],
          ),
        ),
      ),
    );
  }
}
Output
Now, run the app in Android Studio. It will give the following screen where you can scroll horizontally to see all the lists.


