Theoretical Paper
- Computer Organization
- Data Structure
- Digital Electronics
- Object Oriented Programming
- Discrete Mathematics
- Graph Theory
- Operating Systems
- Software Engineering
- Computer Graphics
- Database Management System
- Operation Research
- Computer Networking
- Image Processing
- Internet Technologies
- Micro Processor
- E-Commerce & ERP
- Dart Programming
- Flutter Tutorial
- Numerical Methods Tutorials
- Flutter Tutorials
Practical Paper
Industrial Training

Flutter Splash Screen
A splash screen is a launch screen, start screen, or boot screen, which is a graphical control element containing the image, logo, and current version of the software. It is the first screen of the app that displays whenever the application is loading. It can also be the app's welcome screen that provides a simple initial experience when a mobile game or program is launching. The splash screen is just a display screen that allows users to look something while the hardware is loading to present software to the user.
The common elements of a splash screen contain a company name and logo or a title. The most common example of a splash screen is the Flutter logo on starting the Flutter application or Microsoft logo while starting the Microsoft operating system. In this tutorial, we are going to see how a splash screen is created in Flutter application.
Splash Screen Characteristics
The following are the essential characteristics of the splash screen:
- It is mainly used for branding or identity recognition of the application and puts the branding impression to users.
- It can also be used to show some loading progress indicator while the hardware is loading to present software to the user.
- When the loading of the splash screen completes, the user gets another functional screen that would be home screen or dashboard, then is forgotten. Once the loading completes, we cannot press the back button to return the splash screen.
Here we are going to explain two methods to add a splash screen in our application.
Method 1: In the first method, we will implement the Timer() function to create a splash screen in our app.
First, create a new project in the IDE you are using. Open the project, navigate to the lib folder, and replace the below code with the main.dart file.
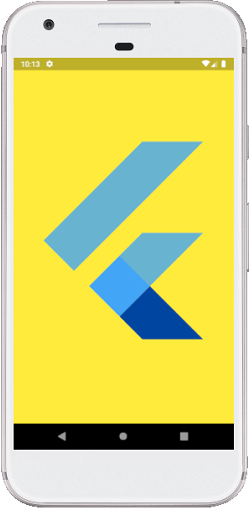
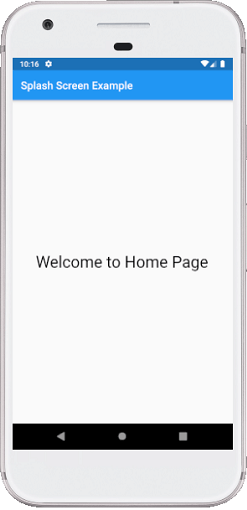
import 'dart:async';
import 'package:flutter/material.dart';

void main() { runApp(MyApp());}

class MyApp extends StatelessWidget {
  @override
  Widget build(BuildContext context) {
    return MaterialApp(
      home: MyHomePage(),
      debugShowCheckedModeBanner: false,
    );
  }
}

class MyHomePage extends StatefulWidget {
  @override
  SplashScreenState createState() => SplashScreenState();
}
class SplashScreenState extends State< MyHomePage> {
  @override
  void initState() {
    super.initState();
    Timer(Duration(seconds: 5),
            ()=>Navigator.pushReplacement(context,
            MaterialPageRoute(builder:
                (context) => HomeScreen()
            )
         )
    );
  }
  @override
  Widget build(BuildContext context) {
    return Container(
        color: Colors.yellow,
        child:FlutterLogo(size:MediaQuery.of(context).size.height)
    );
  }
}
class HomeScreen extends StatelessWidget {
  @override
  Widget build(BuildContext context) {
    return Scaffold(
      appBar: AppBar(title:Text("Splash Screen Example")),
      body: Center(
          child:Text("Welcome to Home Page",
              style: TextStyle( color: Colors.black, fontSize: 30)
          )
      ),
    );
  }
}
In the above code, we have a method initState() called once when the stateful widget is inserted in the widget tree. This method first called the super.initState() and then the Timer function. The timer function contains two arguments where the first is duration, and the second is action to be performed. We have specified duration time five seconds, and after completing the time, the current screen will be replaced with the main screen of the app, i.e., HomeScreen().
Output
When we open the app, we will see the flutter logo first for 5 seconds, shown in the below screenshot.
After completing the 5 seconds, it will display our application's home screen shown in the below screenshot.
Method 2: In the second method, we will use a splashscreen package to create a splash screen in our app. This package provides many attributes that are given below:
SplashScreen ({ Color loaderColor,
int seconds,
double photoSize,
Image image,
Text loadingText,
Color backgroundColor,
Text title,
TextStyle styleTextUnderTheLoader,
dynamic onClick,
dynamic navigateAfterSeconds,
ImageProvider< dynamic> imageBackground,
Gradient gradientBackground})
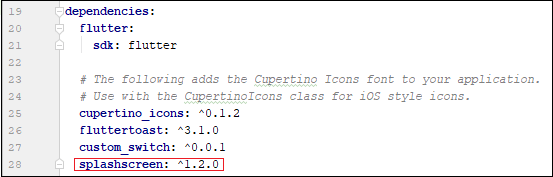
First, create a new project in the IDE you are using. Open the project, navigate to the lib folder, and open the pubspec.yaml file where we need to add the splashscreen dependency as below:
Now, open the main.dart file and replace it with the below code.
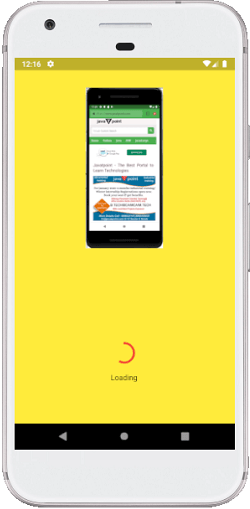
import 'dart:async';
import 'package:flutter/material.dart';
import 'package:splashscreen/splashscreen.dart';

void main() { runApp(MyApp()); }

class MyApp extends StatelessWidget {
  @override
  Widget build(BuildContext context) {
    return MaterialApp(
      theme: ThemeData(
        primarySwatch: Colors.green,
      ),
      home: SplashScreenPage(),
      debugShowCheckedModeBanner: false,
    );
  }
}
class SplashScreenPage extends StatelessWidget {
  @override
  Widget build(BuildContext context) {
    return SplashScreen(
      seconds: 5,
      navigateAfterSeconds: new HomeScreen(),
      backgroundColor: Colors.yellow,
      title: new Text('Flutter Javatpoint',textScaleFactor: 2,),
      image: new Image.network(
          'https://static.javatpoint.com/tutorial/flutter/images/flutter-creating-android-platform-specific-code3.png'
      ),
      loadingText: Text("Loading"),
      photoSize: 150.0,
      loaderColor: Colors.red,
    );
  }
}
class HomeScreen extends StatelessWidget {
  @override
  Widget build(BuildContext context) {
    return Scaffold(
      appBar: AppBar(title:Text("Splash Screen Example")),
      body: Center(
          child:Text("Welcome to Home Page",
              style: TextStyle( color: Colors.black, fontSize: 30)
          )
      ),
    );
  }
}
In the above code, we have a home page as SplashScreenPage() that will return the SplashScreen class. This class has several properties for displaying the splash screen, such as title, image, backgroundcolor, gradientBackground, seconds, loadingText, etc. The second property is used for how much time the splash screen appears to the user, and after completion, it will navigate to a new screen, i.e., HomeScreen() in our app.
Output
When we open the app, we will see the image and loading icon first for 5 seconds, shown in the below screenshot. When the specified time completes, we will navigate to the main page of the application.