Theoretical Paper
- Computer Organization
- Data Structure
- Digital Electronics
- Object Oriented Programming
- Discrete Mathematics
- Graph Theory
- Operating Systems
- Software Engineering
- Computer Graphics
- Database Management System
- Operation Research
- Computer Networking
- Image Processing
- Internet Technologies
- Micro Processor
- E-Commerce & ERP
- Dart Programming
- Flutter Tutorial
- Numerical Methods Tutorials
- Flutter Tutorials
Practical Paper
Industrial Training

Flutter Packages
A package is a namespace that contains a group of similar types of classes, interfaces, and sub-packages. We can think of packages as similar to different folders on our computers where we might keep movies in one folder, images in another folder, software in another folder, etc. In Flutter, Dart organizes and shares a set of functionality through a package. Flutter always supports shared packages, which is contributed by other developers to the Flutter and Dart ecosystem. The packages allow us to build the app without having to develop everything from scratch.
The general structure of the package is given below (Assume a demo package as mycustom_package):
lib/src/*: It contains private Dart code files.
lib/mydemo_package.dart: It is a main Dart code file. We can import it into an application as below:
import 'package:mycustom_package/mycustom_package.dart'
We can also export any other code file into the main code file as below syntax:
Export src/my_code.dart
lib/*: It is a directory, which contains the public code in the package. We can access this code as below:
import 'package:mydemo_package/sub_folder/custom_file.dart'
pubspec.yaml: It is the project's configuration file that will use a lot during working with the Flutter project. This file contains:
- Project general settings such as name, description, and version of the project.
- Project dependencies.
- Project assets (e.g., images).
Types of Packages
According to the functionality, we can categorize the package into two types:
- Dart Package
- Plugin Package
Dart Package: It is a general package, which is written in the dart language, such as a path package. This package can be used in both the environment, either it is a web or mobile platform. It also contains some Flutter specific functionality and thus has a dependency on the Flutter framework, such as fluro package.
Plugin Package: It is a specialized Dart package that includes an API written in Dart code and depends on the Flutter framework. It can be combined with a platform-specific implementation for an underlying platform such as Android (using Java or Kotlin), and iOS (using Objective C or Swift). The example of this package is the battery and image picker plugin package.
Develop a Flutter Package or Plugin
Developing a Flutter plugin or package is similar to creating a Dart application or Dart package. But, it has some exceptions means plugin always uses system API specific to a platform such as Android or iOS to get the required functionality. Now, let us see step by step how to develop a package in Flutter.
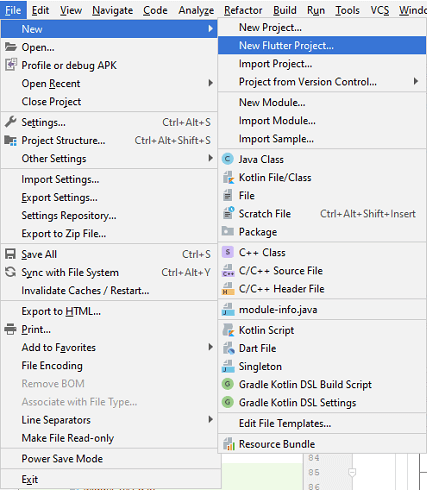
Step 1: First, open the Android Studio and click on File menu -> Select a New Flutter Project. A dialog box will appear on your screen.
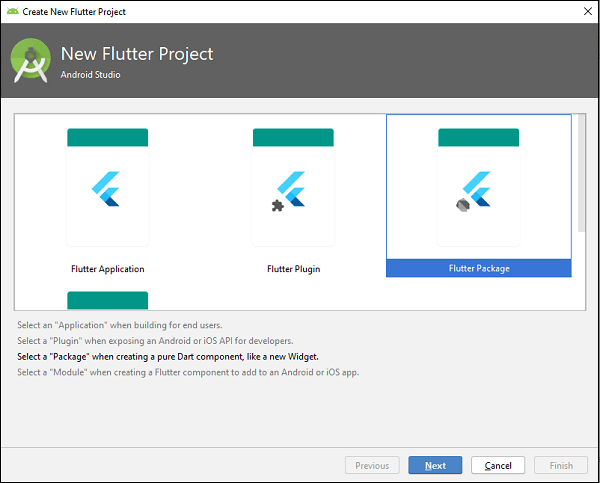
Step 2: In this dialog box, you need to select a New Flutter Project option, as shown in the image below, and click on Next.
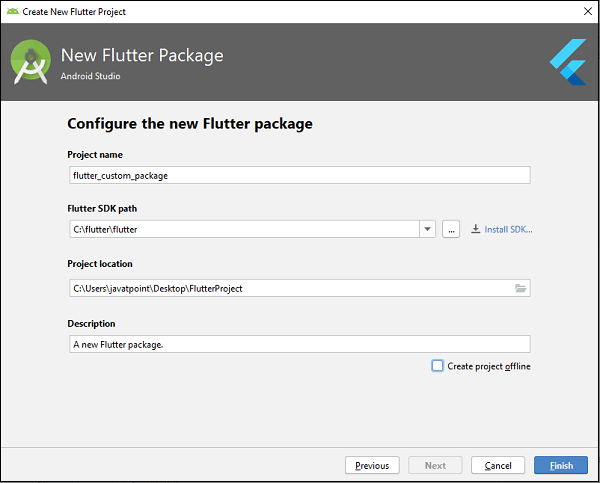
Step 3: In the next dialog box, enter all the details of your package, such as project name, location of your project, and project description. After filling all the details, click on Finish.
Step 4: Finally, your project is created. Now, open the flutter_custom_package.dart file and delete the default code created at the time of project creation. Then insert the following code. This code snippet creates an alert box package.
library flutter_custom_package;

import 'package:flutter/material.dart';

class CustomPackageAlertBox {
  static Future showCustomAlertBox({
    @required BuildContext context,
    @required Widget willDisplayWidget,
  }) {
    assert(context != null, "If context is null!!");
    assert(willDisplayWidget != null, "If willDisplayWidget is null!!");
    return showDialog(
        context: context,
        builder: (context) {
          return AlertDialog(
            shape: RoundedRectangleBorder(
              borderRadius: BorderRadius.all(Radius.circular(20)),
            ),
            content: Column(
              mainAxisSize: MainAxisSize.min,
              children: < Widget>[
                willDisplayWidget,
                MaterialButton(
                  color: Colors.white70,
                  child: Text('Close Alert'),
                  onPressed: () {
                    Navigator.of(context).pop();
                  },
                )
              ],
            ),
            elevation: 12,
          );
        });
  }
}
Now, you need to test your newly created package. To test the package, create a new project. In this project, first, open the pubspec.yaml file and the following code in the dependency section.
dependencies:
   flutter:
      sdk: flutter
   flutter_custom_package:
      path: ../
When you add the custom package in pubspec.yaml file, Android Studio will alert you to update this file. To update the file, click on the Get dependencies and make sure that you have an internet connection during updating of file. The Android Studio automatically get the package from the internet and configure it for your application. Now, you are able to use this package. You can import the package in the dart file as below line:
import 'package: flutter_custom_package/flutter_custom_package.dart';
How to Publish a Package
When you have successfully implemented a package, you can publish it on the pub.dev, so that anyone can use it easily in the project.
Before publishing the package, make sure that the content of pubspec.yaml, README.md, and CHANGELOG.md file is complete and correct.
Next, run the following command in the terminal window to analyze every phase of the package.
$ flutter pub publish --dry-run
Finally, you need to run the following command to publish the package.
$ flutter pub publish